Our Optical Telescope
Jump to Section:

Go to top of pagePictures of the observatory

Outside the observatory
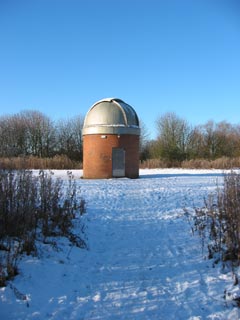
Built in 1992, the University's observatory is located on the edge of the main campus, behind the sports centre. To get there, simply cross the bridge located behind the sports centre and follow the path up to the observatory.
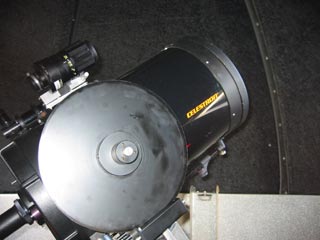
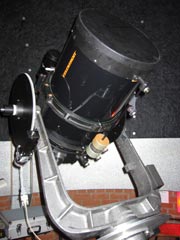
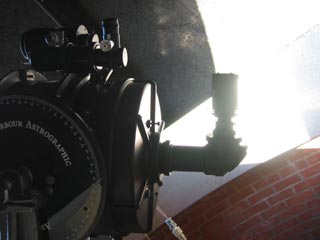
14" Celestron Schmidt-Cassegrain Reflector14" Celestron Schmidt-Cassegrain Reflector
Within the observatory resides a 14" Celestron Schmidt-Cassegrain Reflector. For information on reflector telescopes and other types of telescope, click here to go to the relevant section in the links page.
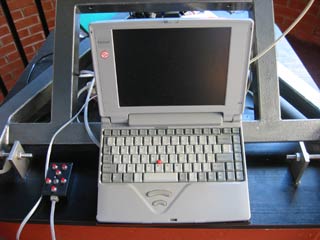
Computer controls
The telescope was initially controlled manually with use of the handpad indicated in the picture on the left (the small black box with red buttons). However, this inevitably made observing more difficult and inefficient. Thus the telescope has recently been upgraded to allow the telescope's motor to be driven by a computer controlled system. This makes celestial objects far easier to find, and observing more productive and enjoyable.
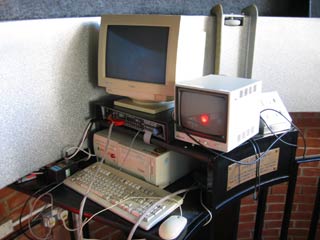
The observatory's computer
There is also a computer within the observatory, which contains - amongst other things - software for students to identify interesting celestial objects. As well as being a useful observing tool, this computer also controls the CCD camera equipment.

Go to top of pageUsing the Observatory and its Instruments

The following information is made available to students in the form of a printed sheet after they have completed their initial training in the use of the observatory.

General Information:-

  1. The observatory is principally for the use of students, staff and associates of the Physics Department.
  2. The technician with particular responsibility for the observatory is Mr Peter Utley (Teaching Laboratory)
  3. Only approved users may book the observatory. Approval is granted by the Observatory Management Committee (Consult Dr. Barton in the first instance.)
  4. The observatory may be booked for use, normally not more than two weeks in advance, by means of a booking chart kept by the technical staff in the second year laboratory, Viewing sessions on consecutive evenings should not be booked in advance except by special arrangement.
  5. A key to the observatory may be obtained, in exchange for a library card, or other proof of identity, from one of the Laboratory Technicians. This must be done prior to 1730hrs on the day of booking. The key must be returned by 0930hrs on the following day. For a weekend booking the key should be returned by 0930hrs on the following Monday.
  6. There are two keys for issue. If there are two key-holders on a particular night, they are expected to cooperate with each other, and arrange a fair distribution of the time. Where practicable they should also cooperate with other would-be users.
  7. All visits to the observatory must be recorded in the Observatory Log-Book.
  8. Responsibility for the safety of the Observatory and its contents rests with key-holders until keys have been returned to the Technicians, and registration cards have been reclaimed. All defects, damage, etc should be noted in the log-book, and reported to Mr Utley, or another of the Technical Staff, on returning the key.
  9. Registered Astrophysics students take priority in booking, when conducting their formal observational assignments and projects.
  10. Undergraduates may not use the observatory at night alone; there must be a minimum of two people present. Any deviation from this regulation will require the express, written, permission of Dr. Barton.
  11. It is recommended that users lock the door once inside the observatory.
  12. The Observatory is connected to the campus telephone network (ext. 2249). Dial 3333 in the event of an emergency.
  13. There are two emergency push-buttons in the observatory. Push one of these if you wish to raise an alarm.

On Arrival

  1. On entering the observatory, disable the alarm by entering the four digit code, followed by the 'Ent'.
  2. Enter your name, date and time into the log-book located directly opposite the doorway.
  3. Open the dome, taking care to lower the flap gently.
  4. Remove covers from the telescope and store safely.
  5. Make your observations.

At all times

  1. Avoid touching any optical surfaces. Cleaning the optics is not the responsibility of students. As such, if you feel that the optics require cleaning, report this to a Laboratory Technician.
  2. Do not try and make adjustments to the telescope such as aligning the finder etc. If alignment is required, report this to a Laboratory Technician.
  3. Be concious of any electrical leads trailing from the telescope. Do not allow the motion of the telescope to strain them.
  4. Do not take food or drink into the observatory.
  5. Be careful. You will be working in very low light levels. Think before you act. A lot of damage can be caused to the equipment and yourselves in a very short time.

On departure

  1. Switch off the telescope drive, battery powered equipment such as graticule illuminators, axial position sensors, and the LED finder.
  2. Reinstate all covers. Store extra eyepieces, with covers, in boxes.
  3. Close the dome, keeping rope clear of the water/oil filled trough. Ensure sliding panel overlaps the flap, and is weather proof.
  4. Files saved to the computer hard disk may be removed without notice. Copy them to your own floppy disks and take them with you, or transfer them to your network m:/ drive.
  5. The computer, CCD electronics and monitor should all be left switched on, with screen brightness and contrast lowered.
  6. Sign out in the Log-Book, noting any interesting observations, malfunctions etc.
  7. Extinguish all internal lights, and make sure the external light is switched on.
  8. Arm the alarm system by entering the code, followed by 'A'.
  9. Exit the observatory and press the white switch by the door. Lock the door.

Using the Computer Controlled Telescope (CCT)

The telescope in the observatory has recently been upgraded to incorporate a computer-controlled system. This system now makes it much easier to find the objects you wish to view. The following is a copy of the sheet detailing how to use the system.

  1. Switch on the mains (13A) supply to the laptop computer. Open the computer (catch at front) and switch on (switch at left side rear).
  2. When the computer beeps, press F8. Select option 5, "Command Prompt". If you miss this, the computer will load Windows 95. In this case, double-click the Desktop Icon 'StartAz', and agree to exit Windows when asked. Step 3 will then be performed automatically, so proceed to step 4. Before going to step 3, use the "time" command to set to atomic time if necessary. Atomic time can be obtained on the desktop computer.
  3. At DOS (Command) prompt, type "startaz" (i.e. start equatorial program). This runs a batch file which sets the default directory, informs the program which configuration file to use, runs a program which creates a data file containing the position of Solar System objects, and runs the equatorial telescope control program.
  4. Switch on the 15V power supply when prompted.
  5. Use the Handpad to set the telescope to 0 degrees Hour Angle (i.e. due South) and 0 degrees Dec, i.e. "Home". In order to do this, push the buttons immediately left/right/up/down relative to the central toggle switch. The central switch should be down for slewing (fast) and up for fine adjustment (slow).
  6. L/R arrows select menus, Up/Down arrows select menu items. Go to Reset/Home. The program now knows approximately where the telescope is pointing, i.e. to "Home".
  7. Go to File/Datafile/Bstars (i.e. Bright Stars). Select a star that is well placed for observation. This will input the equatorial coordinates of the object into the control program. (Alternatively once File/Datafile has been selected, hit "space bar" (which goes to the second set of files) and then go to the "solarsys" file from which you can select any of the planets, or the moon).
  8. Go to Move/Equat. The telescope will move near to the selected object, and starts tracking. Now centre the object in field of view.
  9. Go to Reset/Equat. The telescope and control program will now be accurately set.
  10. Conduct observing session, finding objects visually and using the Handpad, or using the data files as in step 7. The top two switches on the Handpad can perform a variety of actions determined by the Handpad menu, but should normally turn tracking on and off. (This function can also be performed using the hot-key 't'.)
  11. When finished, move telescope back to "Home". Go to File/Quit to exit the program. Turn off the 15V supply when prompted.
  12. Switch off the computer when at the DOS Command prompt. If you started via the Desktop, the computer will insist on reloading Windows. In this case, exit Windows normally.

Go to top of pageThe CCD camera and how to take good images

With the recent upgrade of the observatory's CCD camera equipment, it is possible for students to take some amazing photographs of objects.

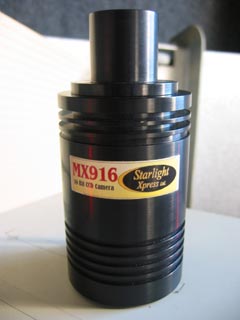
The new CCD camera currently in operation is the MX916 16 -Bit camera from Starlight Xpress Ltd.


For detailed information on the MX916 camera, click here to visit to the relevant page of the Starlight Xpress web site.

The MX916 CCD camera
The CCD camera can simply be mounted as shown on the right, or it can be used in conjunction with an attachment which allows the user to quickly alternate between looking through the telescope with an eyepiece, and taking pictures with the camera.
   

To use the CCD camera please follow these steps:
  1. Take the MX916 from the case holding the optical equipment and mount it on the telescope (using the mirror flip-box or directly as shown in the above image) ensuring that the camera is positioned above the mounting point to minimise the risk that it will fall out due to gravity.
  2. Connect the camera to the 9-pin cable connection to the PC (this cable is usually left behind the monitor after use).
  3. Turn on the power to the MX916 transformer by turning on the switch on the plug faceplate. This outlet is located on wall of the observatory below the PC keyboard and the MX916 transformer.
  4. Start up the camera software on the PC. The icon is on the desktop. Ensure that the software can find the camera. If this fails, check taht the power to the camera is on, the transformer is working (green indicator light) and that the cable to the camera from the PC is properly attached to the camera.

Note that the older CCD camera attached to the frame store located below the PC monitor has a temperature-dependent fault that causes the PC to crash in the cold weather when the PC communicates with the frame store. Use during the winter is not recommended until this is repaired or replaced. If the computer crashes, please restart the computer and do not use this camera.

So how do you take a good photo?

It is often not easy for a photographer to gain correct exposure for an image unless they are experienced in the particular field of photography and are used to operating the specific camera equipment and software that are required to take the photograph.

The main priority of taking a photograph with the CCD camera is to get it correctly focused. However you choose to mount the camera; whether directly onto the end of the telescope, or onto the flip-mirror system available, this can be a tricky process. A simple system assuming the use of the flip-mirror equipment can be carried out as below:

  1. Once you have aligned the telescope properly as per the instructions detailed above (to go to that section, click here), it is now necessary to choose a reasonably bright star which will be easiest to focus on.
  2. Ignoring the CCD camera for now, centre the bright star in the field of view and look through the eyepiece attached to the flip-mirror system. The star will most likely me out of focus, so turn the focussing knob on the telescope until the image becomes in focus and sharp.
  3. Now, flip the mirror over so that the light is directed towards the CCD camera. Take a picture. You will notice that the image that comes up onto the screen will be blurred. This is to be expected since an image focussed with the eyepiece will not necessarily be focussed for the CCD camera.
  4. To get the image in focus will largely require a process of trial and error. As you become more experienced, this will become easier. However, as a guide, try turning the focussing knob half a turn in one direction and taking another picture. Has the image become more or less blurred? Now, using your own judgement, decide which way the focussing knob needs to be turned and by how much it needs to be turned. As you begin to get closer to a sharp image, you should be moving the focussing knob by smaller and smaller amounts until you have a sharp image of a star (which should be as close to a white dot as you can get it).
  5. The CCD camera will now be correctly focussed for very distant objects such as the stars. However, should you now wish to take a picture of a solar system planet, you will be required to make a small adjustment to the focussing for these objects, although this should be a relatively quick process.

Once the camera is correctly focussed, now all that remains is to find the object that you wish to view (through the use of a computer-based sky chart, a sky atlas, or through the use of the objects pre-loaded into the computer control system) and take a picture. The only real obstacle to getting a picture of a celestial body is the relatively narrow field of view of the CCD camera. This can make getting an image difficult because the celestial body needs to be very close to being in the centre of the field of view of the telescope. You will most likely find it easiest to use one of the spotting scopes mounted on the telescope first, to get the object as close to the centre of the cross-hairs on the scope as possible. Then, flipping the mirror over to use the eyepiece, you can finely adjust the orientation of the telescope to get the body as close to the centre of field of view as possible. Hopefully, when you now make an image with the CCD camera, the body you are looking at should be within the field of view of the CCD camera and thus be fully captured in the frame displayed on the computer screen.

It is going to be the case that students will (unless very lucky) make several images that are either under or over exposed and may contain an unsatisfactorily fuzzy image. The only real way to learn how to make a good image of the celestial body you are studying is by trial and error. Experience will tell you roughly what exposure times will produce a well exposed and sharp image of the moon, a planet or a star system. However, as a guide, the following images have been included to give you a rough idea of how to take a decent image. Remember though, try to experiment a bit with exposure times...you may just find that you can produce better pictures than the ones below! You will notice that the first image doesn't have an exposure time. Maybe you could try taking an image of this object yourself and select an appropriate exposure time based on the other image details.

Example Pictures

Click on the thumbnails to download a full-size TIFF file (approx. 106Kb each).

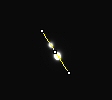
Mizar (Double Star)
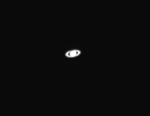
Saturn
 
More pictures coming soon...
Normal mode
5/100 secs, Hi-Res capture
 

To view some pictures taken by students at the University for their laboratory sessions, click here.


Analysing Images

Even before you leave the observatory, you should have a good idea as to how good the image is that you have obtained. Most importantly, you should be able to recognise if you have got the exposure right for you image. It is very easy for the brighter objects of the night sky to become over-exposed and the dimmer objects to be under-exposed. To check the exposure, the CCD camera's control software has a 3D intensity plot facility whereby you can easily tell if the image has been overexposed (the peak representing your object will be chopped off at the top).

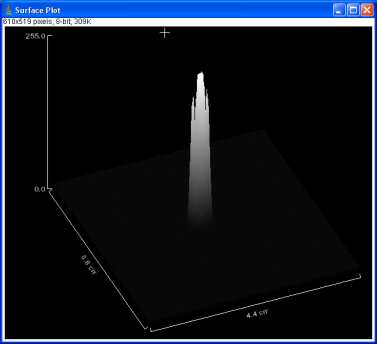
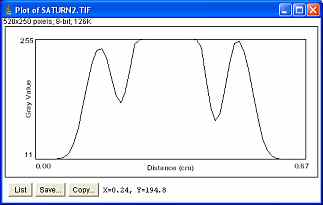
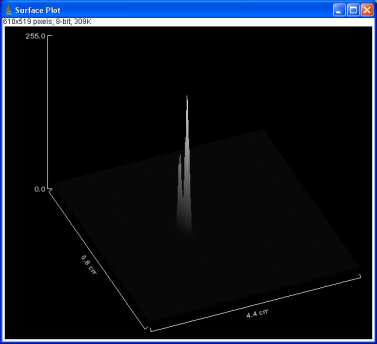
However, once you are away from the observatory and wish to look further into the image you have obtained, probably the best piece of software to use is the ImageJ computer program. It too has a 3D intensity plot (Click on "Analyze", followed by "Surface Plot"), as shown in the picture below left which is of the above image of Saturn. Perhaps of greater use in analysing images however is the "Plot Profile" facility in ImageJ. To use this, simply draw a straight line across the region you wish to look at, then click on "Analyze", followed by "Plot Profile." This will show you the intensity against pixel count over the whole line that you have drawn. This is especially useful if you know the resolution of your image (i.e. what physical distance corresponds to each pixel) whereby, say, the length of a shadow from a lunar crater wall can be obtained by counting the number of pixels where the intensity is noticeably much lower than the non-shadow regions.

ImageJ - "Surface Plot"

ImageJ - "Plot Profile"

As you can see from the above image, the central peak is slightly overexposed (indicated by the peak being slightly chopped off at the top). The above image in this case indicates the usefulness of the "Plot Profile" facility of ImageJ, whereby you can clearly see that the central peak (representing Saturn itself) is slightly overexposed, and you can obviously see Saturn's rings in the form of the two smaller (and thinner) peaks either side of the central one.

These are just two of the many features that programs such as ImageJ have for you to utilise in analysing, editing or enhancing your images. A good use of the above detailed facilities would be to look at variable stars (stars whose brightness varies over a specific time period) and attempting to calculate their periods by looking at how the brightness changes (relative to a fixed-brightness star in the same field of view) between observing sessions.

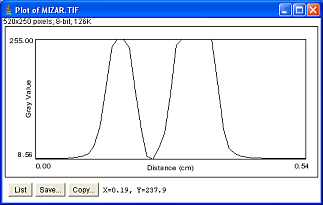
As an example of how you can use ImageJ to look at the difference in apparent magnitude between two (or more) stars, here are the surface and profile plots of the Mizar picture from above:

It is of course obvious from simple inspection of the image that the stars have noticeably different apparent magnitudes. This is clearly shown in this surface plot.

And again, you can see the differences in intensity in this profile across the line detailed above. You can see that the brighter star is overexposed by quite a bit and the dimmer star is also very slightly overexposed. If you were indeed to study variable stars, you would need to expose them so that the peaks of the variable and the comparison stars fit wholly into the profile plot and that you are consistent with your exposure times.

More details on the ImageJ computer program can be found via the links section of this site. To go there now, click here.