Our
Radio Telescope
Our
radio telescope
|
The
University of York's radio telescope was built by technicians in the workshop
here. The telescope, seen under construction in the workshop on the left,
was designed and built (with associated electronics) entirely at the University... |
  |
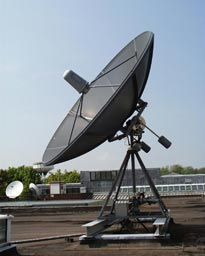
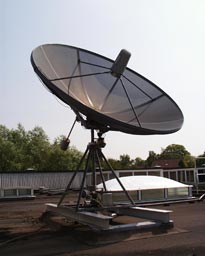
...and here
is the 3m diameter dish on the roof, ready for use by students and staff. |
| |
These pictures
show the drive mechanism for the telescope fitted with the brake on. This
brake is used when the weather gets nasty and there is a danger of high
winds damaging the telescope. Whilst this brake is on, the telescope is
locked in position to prevent strain on the drive mechanism. |
 How
to operate the telescope
The two sets of controls
which are used to manoeuvre the telescope are in altitude and azimuth coordinates.
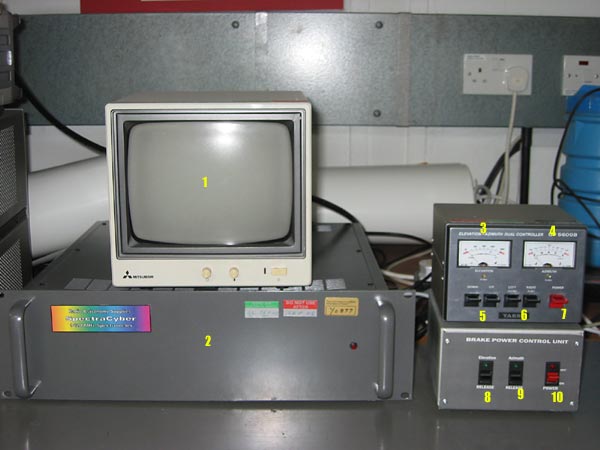
The control box itself (as seen to the right of the picture below) consists
of a brake system and a drive system. In order for the drive system to work
in either the altitude or azimuth directions, you must first release the brake
by holding down the brake switch, then holding down the drive switch. Thus as
a safety measure, if the break switch is let go, the telescope will no longer
turn.

1
Monitor for visual checking of telescope orientation and movement. 2
21cm Hydrogen line spectrometer. 3
Altitude indicator. 4 Azimuth
indicator. 5 Altitude drive controls
(up/down). 6 Azimuth drive controls
(CW/CCW). 7 Drive unit power switch.
8 Altitude brake release switch. 9
Azimuth brake release switch. 10
Brake unit power switch.
 Important
safety information for students using the radio telescope
Whereas actually operating
the equipment present little risk to yourself, there are risks to the equipment.
To ensure that the telescope remains in good working order, all students must
follow the following guidelines.
Wind
- It is highly important
that when moving the telescope, you check that the winds outside are not too
strong. To determine if it is safe to move the telescope, there is a wind
sock near to the telescope which will give an indication as to whether it
is safe to move the dish. If you are in any doubt, ask a technician. This
is important, as if the telescope is moved in high winds, it will put strain
on the gears and you may break it.
- If at any point you notice that the winds are getting strong,
you must cease the experiment you are doing and return the telescope to the
'parked' position (altitude 90 degrees, azimuth 90 degrees), i.e. it should
be aligned vertically to minimise the surface area of the dish exposed to
the wind.
- Prior to any forecasted strong winds, it is likely that technicians
will have locked the telescope in the 'parked' position manually. If not and
you are using the equipment and believe there to be a danger to the telescope
from winds, please contact a technician so that they can access the roof and
lock the telescope manually.
- When leaving the controls for any significant length of time,
please put the telescope in the parked position. The same goes for when you
finish using the equipment for the day, the telescope should always be placed
in the parked position.
Stuck gears
- It is often the case
that when you are moving the telescope, the drive mechanism seems to become
stuck and the telescope will move no further. This is probably due to dust
and other debris becoming stuck in the gears and stopping them from turning.
If this happens, simply attempt to move the telescope in the opposite direction
and then back again. Do not rapidly press and release the drive controls as
this could damage the motors.
- If the problem persists,
contact a technician and they will access the telescope and assess the problem.
 Choosing
your radio source and making an observation
The radio waves that students
predominantly observe with this telescope come from hydrogen clouds throughout
the galaxy (or even in nearby galaxies). The system is thus set up to look at
the 21cm (1420MHz) hydrogen spectral line. It is this specific wavelength which
forms the basis of the radio telescope laboratory experiment, as this experiment
involves looking at various regions in the plane of the Milky Way.
As it is most likely that
students will be observing gas clouds within the Milky Way (although, as previously
stated, it is possible to look at nearby galaxies), here is a rough guide to
making observations:
- Decide where in the Milky
Way you want look. The laboratory experiment will involve looking at a wide
range of galactic coordinates, and to obtain the most useful information,
you will usually be looking in the galactic plane (galactic latitude 0,0,0).
For example, galactic longitude (0,0,0) with galactic latitude (0,0,0) will
have you looking straight through the centre of the galaxy.
- You will next have to
convert the galactic coordinates you have chosen into figures of altitude/azimuth
coordinates so you will be able to point the telescope (controlled in alt/az
coordinates) to the correct point in the sky. To do this, you will need to
use the coordinate conversion program, located via the MS Quickbasic link
on the desktop.
- Once you have the telescope
pointed in the correct direction, to obtain the most accurate scans, it is
also possible to make a correction for the Earth's relative motion towards/away
from the source. This relative velocity can be calculate by going to "Velocity
Line of Sight.exe" on the desktop and choosing the "vel" command.
Help on this command is given in the program. However, how you choose to handle
this information is completely up to you; whether you attempt to input this
figure into the scanning program (discussed below) or you simply make a qualitative
discussion on the effect it has.
- SpectraCyber is the program
that is used for making the scans. There are many different features which
can be adjusted to make the best scans, so it isn't practical to go through
them all here. However, the program is fairly self explanatory and students
will be given a brief introduction on the use of all programs before they
start using the equipment. When you start the scanning process, you will see
your data being plotted on a graph of volts (i.e. intensity) against Doppler
shift (viewable in figures of Km/s or KHz). It is then up to yourself to determine
what the data that you have collected means and how you can use it to build
up a picture of the structure of the Milky Way.
- It is then possible to
save the scan that you have taken, before opening up this data in a program
such as EasyPlot for further analysis on the key features of the graph and
the peaks on it (such as gas cloud temperature).
 So
how do you get a 'good' scan?
Well, depending on what
you hope to gain out of the observations you are making (be it a qualitative
discussion or a rigorous quantitative investigation of the your chosen source),
there are several steps that you can take to make sure you are obtaining the
best quality data that you possibly can.
- Repeat readings
- Take as many repeat scans of the same part of the galaxy as you can. The
more repeat scans you do, the less electronic noise becomes a problem since
this becomes averaged out. You should aim to do a minimum of 3 scans of each
part of the sky.
- Clear sky readings
- You may also find it prudent to take what is known as a clear sky reading
(i.e. pointing the telescope completely out of the plane of the galaxy and
taking a scan of "free space"). Doing this will ensure that earth-based
sources are not interfering with your scans of the Milky Way.
- The Earth's relative
motion to source - As mentioned previously, it is possible to make an
adjustment for the relative motion of the Earth towards your source. This
relative motion will obviously have an effect on the Doppler shift readings
that you obtain.
- Inside the SpectraCyber
programme -
There are also things within the scan programme that you can do to gain the
best scans. Adjusting a fairly wide range of settings will give you a better
quality scan. For instance, you can adjust the scan rate, time/step and spectral
gain amongst others.
Click
here to read about an experiment with the radio telescope.


![]() Important
safety information for students using the radio telescope
Important
safety information for students using the radio telescope![]() Choosing
your radio source and making an observation
Choosing
your radio source and making an observation![]() So
how do you get a 'good' scan?
So
how do you get a 'good' scan?