Virtual production on an iPhone
No studio, no green screen, no lighting rig: from a phone video to a relit shot in a virtual city
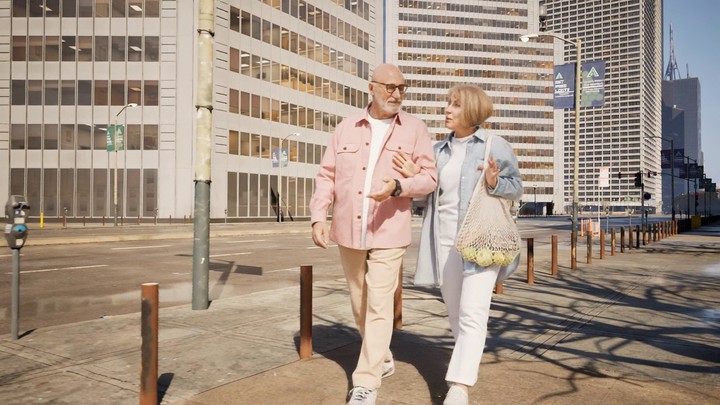 A park walk, relocated to a city street and relit. Footage: SHVETS production via Pexels; background: City Sample, Epic Games.
Virtual production used to mean a studio: a green screen or an LED wall, a lighting rig to light that screen evenly and to light the actors flatly enough that their lighting can be fixed later, tracking markers, a motion-control or tracked camera, and a team of compositors. The core idea is much simpler than the kit suggests: film a real performance, then replace everything behind the performer with a virtual world, seen through a virtual camera that moves exactly as the real one did.
My argument in this post is that you no longer need the studio. The two jobs it does, separating the actor from the background and controlling the light on the actor, can now be done by AI after the fact. So you can shoot anywhere: a park, a street, your kitchen, in whatever light happens to be there, on whatever camera is in your pocket.
I’ll walk through the pipeline end to end, using nothing more exotic than an ordinary handheld video and the free City Sample project for Unreal Engine. In PXLD’s web app, the Enter a new world pipeline does the whole thing for you: upload the clip, pick a 3D world, and it tracks the camera, places your shot in the world, renders the background and a 360° view, mattes the actors, composites them and harmonises the result. In this post I swap in Unreal Engine as the renderer, which is a small change to the same pipeline. To show why each step matters, I’ll also build the shot the naive way and show exactly where it falls down.
Here’s where we’re going: on the left a couple walking through a leafy park, filmed in dappled sunlight with no green screen in sight; on the right the same performance on a sunny city pavement. Studio and professional virtual production quality with nothing more than a mobile phone video and PXLD’s tools.
The recipe
Green-screen virtual production has a handful of ingredients. Strip away the hardware and you’re left with seven steps:
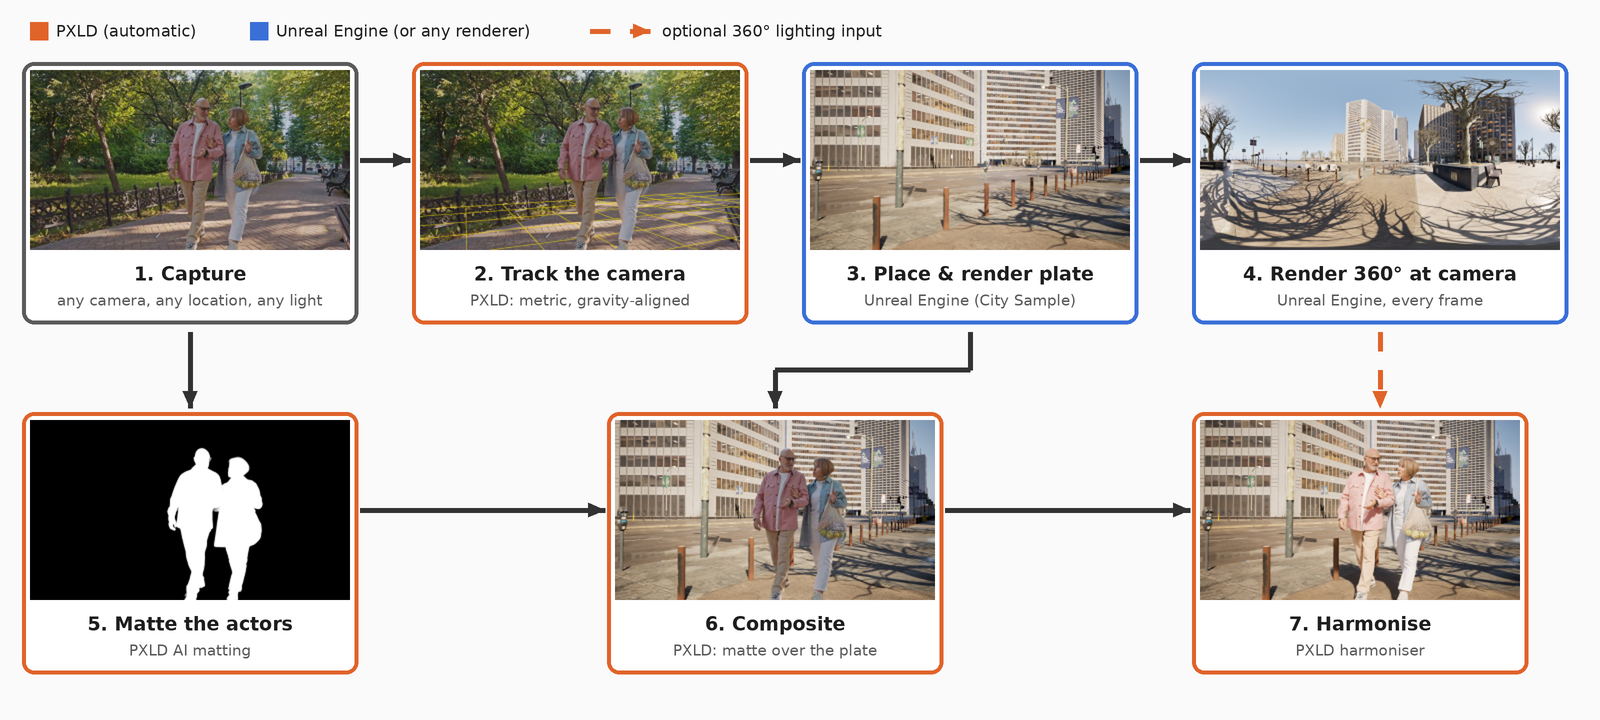
- Capture the performance on video.
- Track the camera (PXLD, automatic): recover where the camera was and which way it pointed in every frame.
- Align the virtual scene to the real one, so the floor the actors walk on lines up with a floor in the virtual world.
- Render the virtual scene through a camera that moves exactly like the real one, with the same lens.
- Matte the actors (PXLD, automatic): cut them out of the original footage.
- Composite the actors over the render (PXLD, automatic).
- Harmonise the result (PXLD, automatic) so the actors look lit by the new world rather than the old one.
So you bring two things, the footage and the virtual world, and PXLD does the rest. (In New World, PXLD also places and renders the shot, steps 3 and 4. In this post I render those in Unreal myself.)
Steps 1–6 are classic visual effects. In a studio, the green screen exists to make step 5 easy, and the lighting rig exists because there was no good step 7. Let’s go through them in turn.
1. Capture
Shoot wherever the performance looks good. There’s no screen to stand in front of, no need to keep the actors a few metres clear of it to avoid green spill, and no need to light them flat. This clip was filmed in a park in strong, dappled sunlight: exactly the kind of lighting a compositor would normally beg you to avoid, because it’s baked into the actors and can’t simply be switched off.
2. Track the camera
To render a background that moves correctly, we need the real camera’s pose (position and orientation) in every frame, plus its focal length.
In a virtual production studio this is a hardware problem. A typical setup bolts a small infrared tracking camera to the cinema camera, pointing up at a ceiling covered in retro-reflective dots. Infrared emitters light the dots, the tracking camera sees them, and because their positions in the studio have been surveyed, the camera’s position and orientation can be worked out live. Other setups use an array of motion-capture cameras around the stage watching markers on the camera rig, plus encoders on the lens to report zoom and focus. It works very well, but it’s expensive, it has to be installed and calibrated, and it only works inside that room.
You don’t need a separate tracking tool for this, or any tracking hardware: PXLD solves the camera automatically from the uploaded clip, with no markers and no lens data. It then exports the track for Unreal, Blender or Nuke, ready to drive the virtual camera.
Under the hood this is structure from motion. As the camera moves, static parts of the scene shift across the image by amounts that depend on their distance, and that parallax pins down both the camera path and the scene’s 3D structure. For virtual production a plain structure-from-motion solve isn’t enough, and PXLD’s track adds the two things it lacks:
- Metric scale. The camera path comes out in metres, not some arbitrary unit. That matters because Unreal’s world is metric too: a 1.7 m tall person needs to stand next to a 1 m tall bollard.
- Gravity and the ground. The track knows which way is down and where the floor is, so it arrives with a floor at height zero and a true vertical, ready to drop into the virtual scene.
Check it. The simplest test is to draw a metric grid on that ground plane and project it back into the footage. If the track is right, the grid stays stuck to the pavement as the camera moves:
3. Align the virtual scene
Next, decide where in the virtual world the shot happens. Technically this is a rigid transform: a yaw rotation plus a translation that puts the tracked floor on top of a real floor in the virtual scene. Creatively it’s location scouting, and there are a few hard constraints:
- the ground under the actors’ feet must be flat for the whole shot (a kerb that the real actors didn’t step over looks instantly wrong);
- nothing in the virtual scene may sit between the camera and the actors, because a 2D composite can’t put a lamp post in front of someone (though this can be fixed by estimating the depth to the person);
- and here’s the fun part: we get to choose the sun.
PXLD builds a top-down map of any 3D world from an aerial render, then searches automatically for placements that satisfy those constraints. Because sunlight is just rays, the map also predicts where the actors would be in sun and where in shade, so it can pick spots where they walk through interesting light: here, a pavement dappled by tree shadows.
4. Render the background
With the placement fixed, we turn the solved track into an Unreal camera, matching focal length, sensor size and principal point, and render the empty scene frame by frame with Movie Render Queue. This is the background plate:
5 and 6. Matte and composite: the naive version
Now cut the actors out and paste them in. In a studio this is where chroma keying comes in (more on that below). We have no green screen, so we need a model that can find people against any background. In PXLD’s New World both steps happen automatically, but it’s instructive to first do them the naive way. The quickest way to get a cutout like that is a segmentation model: SAM 3 gives a per-frame binary mask of each person (and, if you ask, the bag one of them is carrying). Paste the masked pixels over the plate and you have a composite:
It’s surprisingly convincing at a glance: the camera move and the background agree, and the actors stay planted. Watch it for a few seconds, though, and the illusion falls apart.
What’s wrong with it?
Three things, roughly in order of how quickly your eye notices them.
The lighting doesn’t match. The couple were filmed in green-tinged sunlight dappled by leaves, and that light is baked into every pixel of them. They’ve landed on a bright, open city pavement lit from a different direction. Their colours, contrast and shading all say “somewhere else”. Look at their feet: the pavement around them is crossed by crisp tree shadows from the city’s sun, and the light on them doesn’t follow it.
There are no shadows or reflections. In the real world the actors would block the sun and cast shadows across the pavement, and darken the ground right under their feet. In the composite they cast nothing, so they seem to float on the ground rather than stand on it.
The edges are wrong. A binary mask is either “person” or “background” at every pixel. Real edges aren’t like that: hair, a mesh bag and motion-blurred hands are partly transparent, and edge pixels mix the person’s colour with whatever was behind them in the original scene. Cut those out with a hard mask and you keep a fringe of park around the edges, or you lose the fine detail entirely.
None of these are new problems; they’re exactly what compositors spend their days fixing by hand. PXLD’s tools exist to take that work away.
Better edges: AI matting instead of a green screen
What a green screen actually buys you
Chroma keying is the reason studios paint walls green. If you know the background is a single, saturated colour, you can decide for every pixel how much of it is “screen” by how close its colour is to the key colour. That gives a soft alpha matte, so hair and motion blur survive, and the background colour you know can be subtracted from the edges (despill).
It’s a clever trick, but every one of its assumptions becomes a rule on set:
- the screen has to be evenly lit, or the key colour drifts across it and the matte gets holes and noise;
- the actors have to stand well clear of it, and even then green light bounces onto them (spill);
- nobody can wear green (or anything reflective, or anything see-through);
- the actors are usually lit flatly, so their lighting can be adjusted later to match the virtual scene;
- and the background behind the actor has to be the screen, which means a studio, not a location.
Learned matting
An AI matting model learns what people, hair, clothes and held objects look like, so it can separate them from any background: trees, traffic, a busy kitchen. You choose who to keep (here both people and the shopping bag), and it does the rest.
A segmentation mask like SAM 3’s is a first step, but it’s binary. PXLD’s matting (in its high-quality mode) produces what a good chroma key does, without the screen. For every pixel it estimates
- an alpha value $\alpha \in [0,1]$: how much of that pixel is foreground, and
- the foreground colour $F$: what the person looks like in that pixel with the original background’s colour removed.
With those two, compositing is the textbook “over” operation, done in linear light:
$$ C = \alpha F + (1-\alpha)\, B , $$
where $B$ is the background plate. Because $F$ has the park’s spill taken out, soft edges take on the colours of the new background rather than the old one.
That’s the green screen made redundant. But the bigger problem remains: a perfect cutout of someone lit for a park is still someone lit for a park. In a studio, this is why you’d light the actors flat and match them by hand later.
Better light: PXLD harmonisation
PXLD’s harmoniser takes the rough composite and re-renders the actors so that they belong in it. It removes the lighting that was baked in when they were filmed, here the dappled park sun, and relights them for the new scene: colour, contrast, shading and direction of light. It also adds the interactions a cut-and-paste can’t produce, such as shadows on the ground.
That’s what removes the last reason for a studio. You don’t need flat, neutral light on set, because the harmoniser replaces whatever lighting you shot in. It’s a video model, so it works on the whole shot at once and stays consistent over time rather than flickering frame to frame.
Crucially, the harmoniser is not re-generating the person and their performance like a generative video model. Every pixel of a person and their performance is preserved, with only its shading and shadowing adjusted.
On its own, the harmoniser has to infer the lighting from what’s visible in the frame. But much of the light that falls on a person comes from outside the frame: the sun behind the camera, the bright building opposite, the sky overhead. So the harmoniser can optionally take a second input, a 360° video centred on the camera.
Rendering the 360° view in Unreal
Rendering a 360° view in Unreal is cheap, because we already have the camera track. At every frame I render six extra cameras from the tracked camera position, each with a 90° field of view, pointing forward, back, left, right, up and down relative to the camera. Then I stitch the six cube faces into an equirectangular image. The six faces are rendered in the same pass as the plate, so the cars, crowds and sun are identical across all seven views.
The result is an equirectangular (ERP) video in the camera’s own frame: the centre of the image is where the camera is looking, the left and right edges meet behind the camera, and the top and bottom rows are straight up and down.
Because the 360° view follows the camera, the harmoniser knows where the light comes from relative to the shot, including sources that never appear in the frame. When the actors walk from shade into sun, or the camera turns towards a bright facade, the lighting on them changes accordingly.
The result
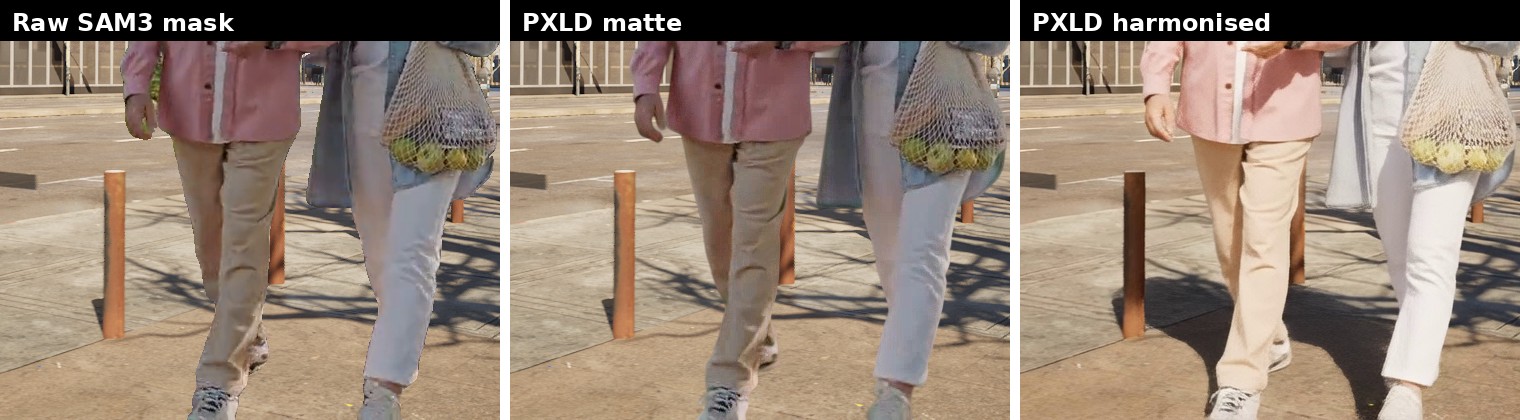
Side by side with the matte-only composite, the difference is obvious. The green, leaf-dappled park light is gone; the couple pick up the warm, hard sunlight of the street, their contrast matches the plate, and they cast shadows on the pavement:
More examples
I applied the same pipeline on a few very different shots. In each case the left side is the original footage and the right side is the harmonised result at a different location in the City Sample scene.
What you no longer need
Put together, the pipeline removes most of the reasons a studio exists:
| In a studio | Here |
|---|---|
| Green screen, evenly lit | Shoot against anything. AI matting separates the actors |
| Keep actors away from the screen, no green costumes | No screen, so no spill and no costume rules |
| Flat, neutral lighting on the actors | Shoot in any light. The harmoniser relights the actors for the virtual scene |
| Tracking hardware: infrared markers on the ceiling, a tracking camera on the rig, lens encoders | Automatic, markerless camera tracking by PXLD, straight from the video |
| Hand-painted shadows and colour matching | Harmonisation adds shadows and matches light and colour |
What’s left is the part that was always the point: a performance, a camera move, and a world to put them in.
Try it
There are two ways to use this with PXLD today:
- Fully automatic: use Enter a new world in the web app. Upload your clip and choose a 3D world, and PXLD tracks the camera, places the shot, renders the background plate and the 360° view, mattes, composites and harmonises. You get the finished shot back.
- Bring your own renderer: use the web app for the matte and the camera track, and export the track to Unreal, Blender or Nuke. Render the background (and, optionally, the 360° view) yourself, composite the matte over it, and upload the composite to PXLD’s harmoniser. That’s the route this post follows with Unreal Engine, and nothing about it is specific to Unreal: any renderer that can reproduce your camera and render six cube faces will do.
Credits
- Background scenes: City Sample by Epic Games, rendered in Unreal® Engine. Unreal® Engine, Copyright 1998–2026, Epic Games, Inc. All rights reserved. Unreal and its logo are trademarks or registered trademarks of Epic Games, Inc.
- Walking couple (main example): SHVETS production via Pexels. Edited with PXLD.
- Basketball: Chimera, Netflix Open Content, licensed under CC BY 4.0. Modified by PXLD.
- Cyclist: Serg Alesenko via Pexels. Edited with PXLD.
- Sprinter: RDNE Stock project via Pexels. Edited with PXLD.
- Tools: camera tracking, matting, compositing and harmonisation by PXLD (PXLD’s camera tracking builds on NVIDIA’s open-source ViPE); the naive comparison composite uses SAM 3 (Meta).
The people in the stock clips have no connection with PXLD and don’t endorse it.
