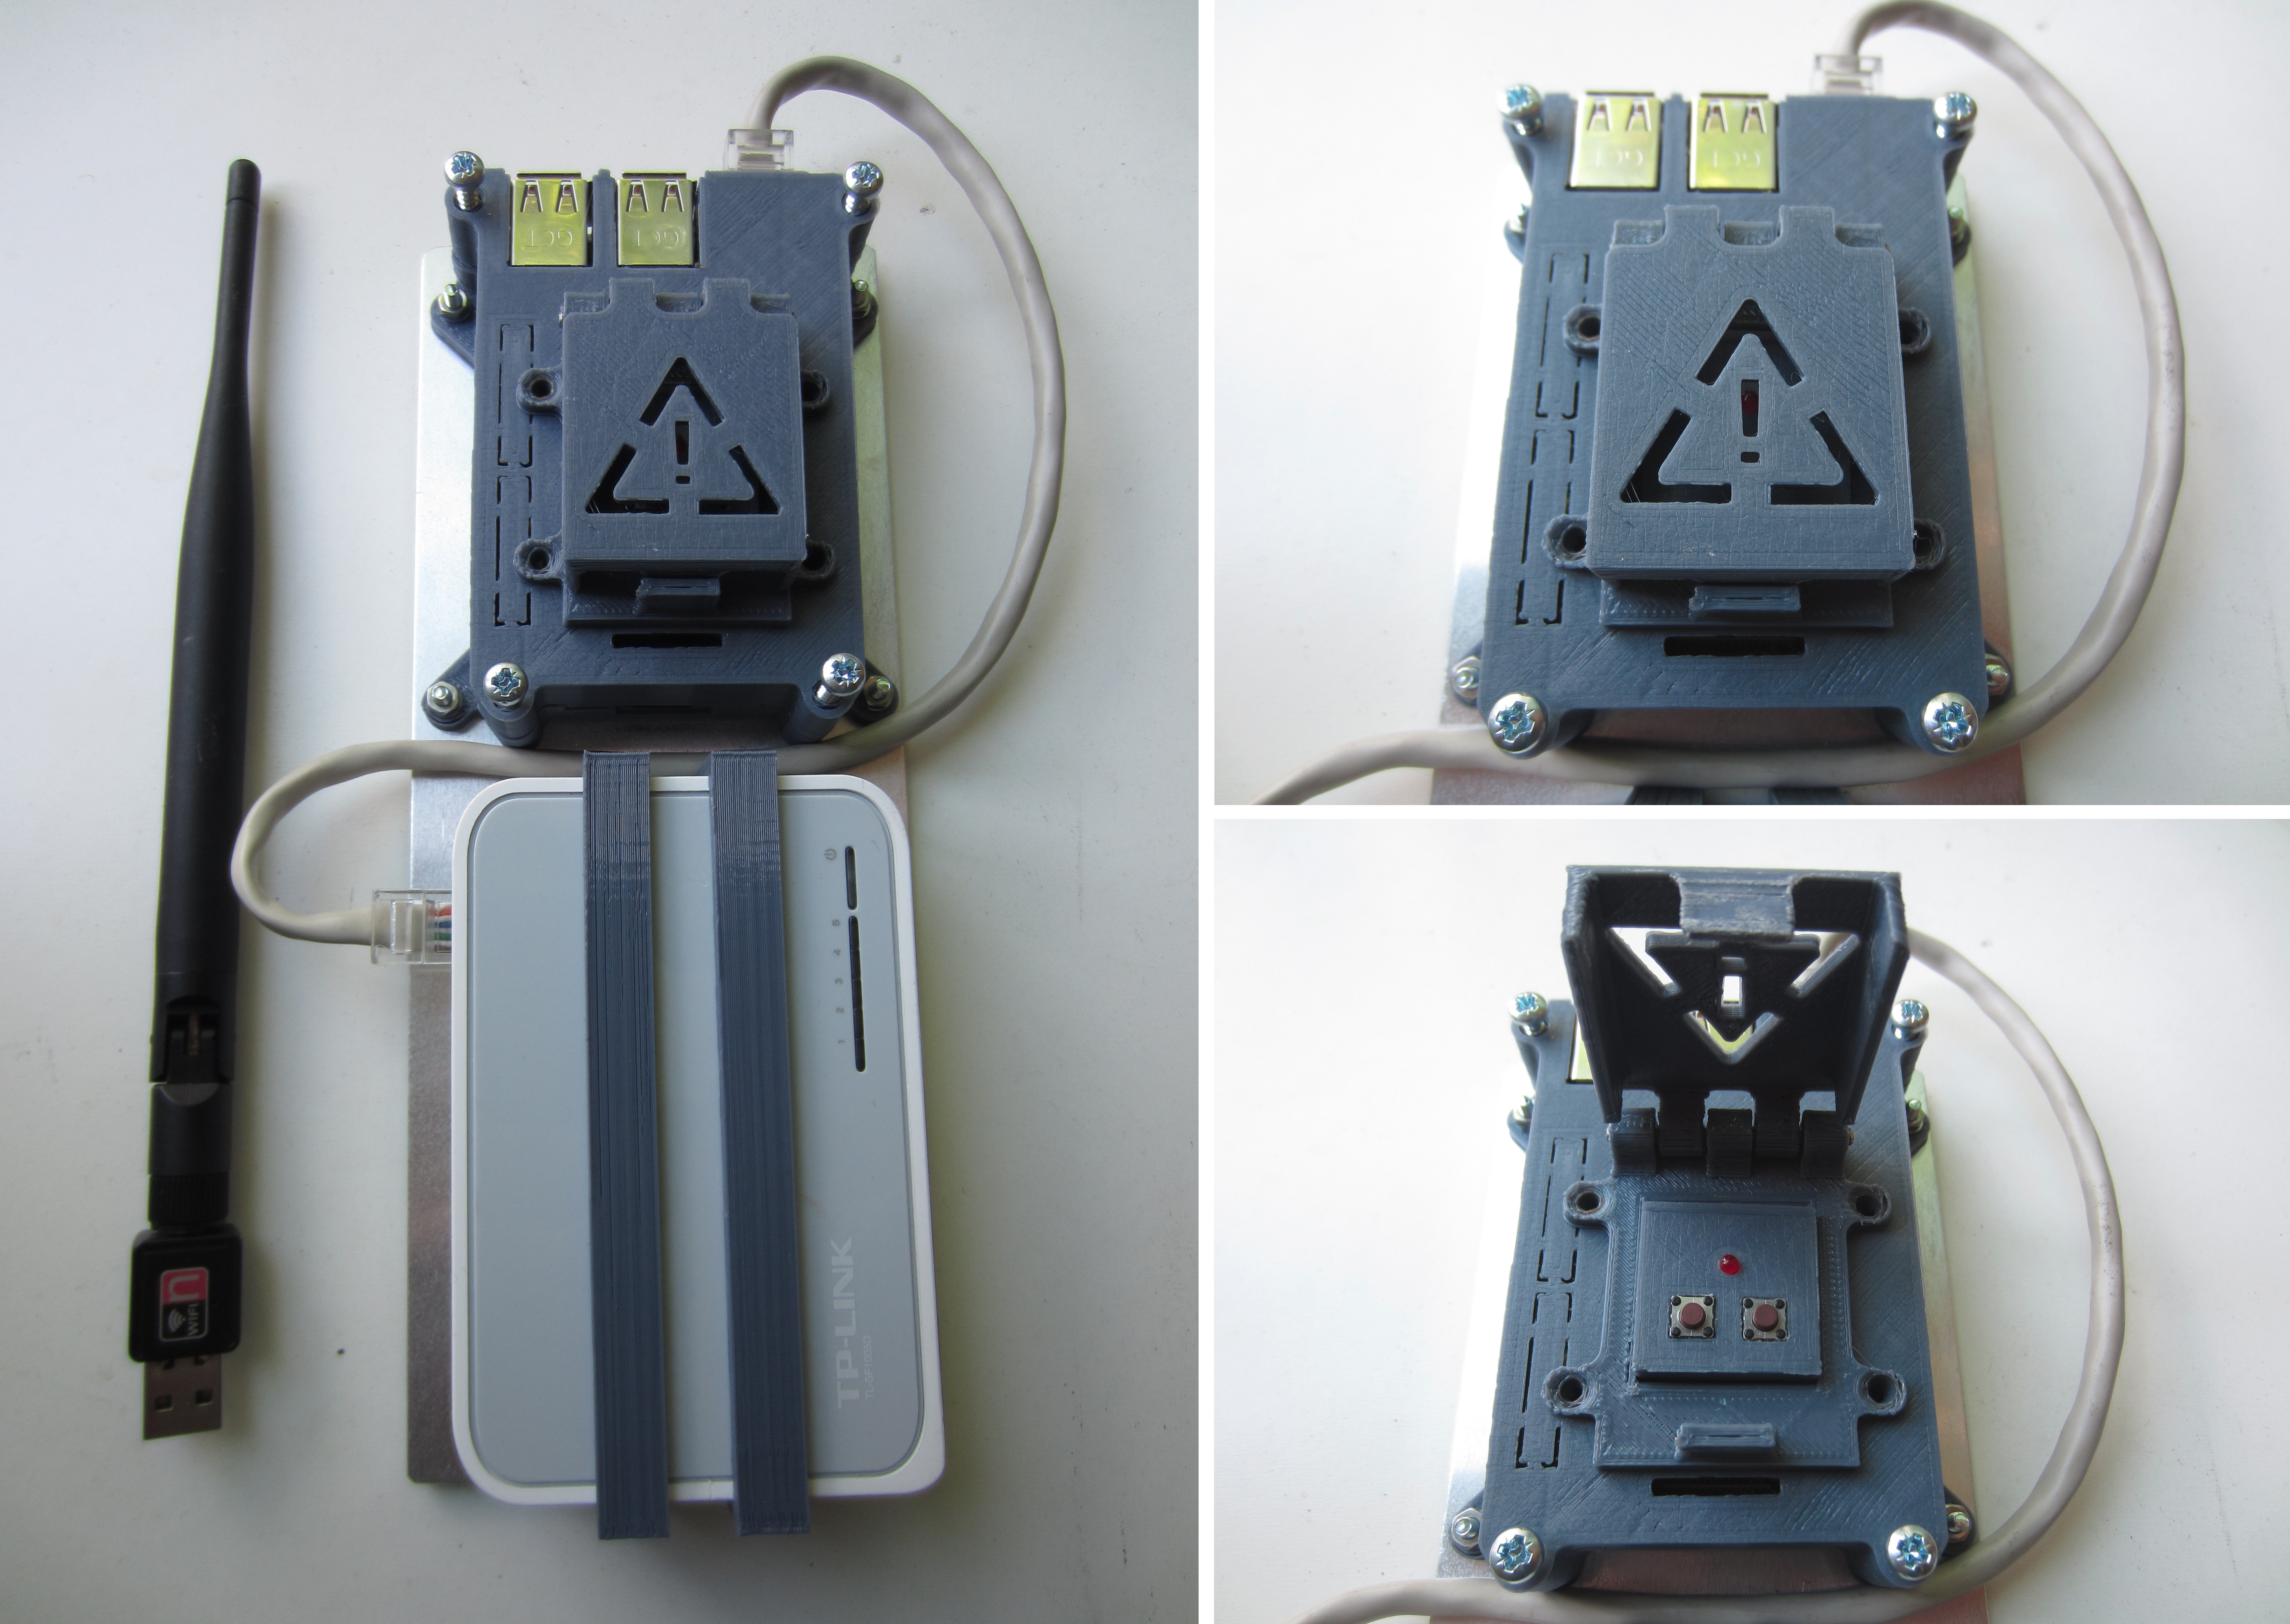
To work Shed-cam (Link) needs a network, unfortunately the wifi signal in that part of the garden is bad, which in some respects is a good thing i.e. from a security point of view i want to keep the wifi signal in the house. To get over this problem could of build / purchased a wifi extender, a simple solution, but bad of security and would of added interference to the neighbours AP. Therefore, went for a wired and wifi bridge combo i.e. wired from the shed to the garage, then wifi to the house. To be honest, would always pick wired over wifi as its simply more reliable. To implement this network used the hardware shown in figure 1.
Figure 1 : Raspberry Pi + network hardware
The case is the same as the previous pi-case: (Link). Note, used a soldering iron to melt through the four mounting holes, this actually had the side affect of welding the base to the case, so don't need the four screws. The network switch was mounted to the back sheet of aluminium by some simple brackets shown in figure 2. These can be downloaded here: (Link).

Figure 2 : network switch brackets
The raspberry pi is a pi2 so on on-board wifi. To be honest this is a good thing as the USB wifi module allows me to add a reasonable antenna i.e. the wifi signal strength is going to be weak as i needs to pass the signal through a floor and wall to get to the boradband router. To ID the USB wifi device use ifconfig, to connect this to the wifi network used to wpa_passphrase to generate the wpa_supplicant.conf example and files as shown below:
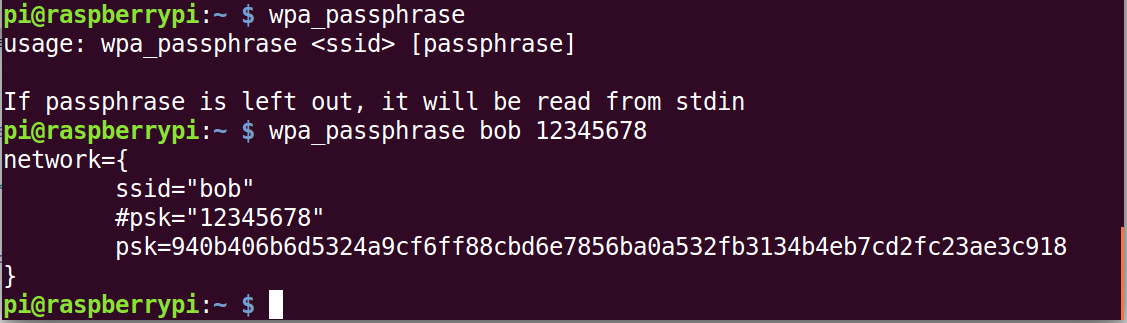
Figure 3 : wpa_passphrase and wpa_supplicant.conf
Save the output of wpa_passphrase to /etc/wpa_supplicant/wpa_supplicant.conf. NOTE, it goes without saying that 12345678 is not a secure password :), also remember to change ownership of the file and read permissions so nobody else can see the true password, as below:
sudo chown root:root /etc/wpa_supplicant/wpa_supplicant.conf
sudo chmod 600 /etc/wpa_supplicant/wpa_supplicant.conf
Finally, edit the network interface file /etc/network/interfaces to set everything up:
auto lo
iface lo inet loopback
        pre-up iptables-restore < /etc/network/rules.v4

auto wlan0
iface wlan0 inet dhcp
        wpa-conf /etc/wpa_supplicant/wpa_supplicant.conf

auto eth0
iface eth0 inet static
        address 192.168.0.254
        network 192.168.0.0
        netmask 255.255.255.0
        broadcast 192.168.0.255
Went for static ip address on the wired interface, could of added dhcp, but as there will only be two things connected to this router i.e. shed-cam and hedgehog-cam, it seemed a little over kill. Whichever way these addresses are assigned you do need fixed ip addresses when running headless boxes, otherwise its tricky to know which address to ssh into. To enable packets to be forwarded between interfaces edit /etc/sysctl.conf as below:
net.ipv4.ip_forward = 1
Then define firewall rules using iptables, i normally have these in a script, as shown below:
#!/bin/sh

#First, delete all existing rules

#!/bin/sh

#First, delete all existing rules
iptables --flush
iptables --delete-chain
iptables --table nat --delete-chain
iptables --table nat -F
iptables --table nat -X

#########
# INPUT #
#########

iptables -A INPUT -s 192.168.1.0/24 -i wlan0 -p tcp --dport 22 -j ACCEPT
iptables -A INPUT -m state --state ESTABLISHED,RELATED -j ACCEPT
iptables -A INPUT -i lo -j ACCEPT

# Debug
iptables -A INPUT -p icmp -j ACCEPT

#########
# OUPUT #
#########

# Debug
iptables -A OUTPUT -p icmp -j ACCEPT

iptables -A OUTPUT -m state --state ESTABLISHED,RELATED -j ACCEPT
iptables -A OUTPUT -o lo -j ACCEPT

###########
# FORWARD #
###########

# Standard WEB
iptables -A FORWARD -p icmp -j ACCEPT

#NAT Forwarding
iptables -t nat -A POSTROUTING -o wlan0 -j MASQUERADE
iptables -A FORWARD -i wlan0 -o eth0 -j ACCEPT -m state --state RELATED,ESTABLISHED
iptables -A FORWARD -i eth0 -o wlan0 -j ACCEPT

#########
# DEBUG #
#########

#iptables -A INPUT -j LOG --log-prefix "** INPUT:DROP **:" --log-level 6
#iptables -A OUTPUT -j LOG --log-prefix "** OUTPUT:DROP **:" --log-level 6
#iptables -A FORWARD -j LOG --log-prefix "** FORWARD:DROP **:" --log-level 6

#########
# BLOCK #
#########

iptables -A INPUT -j DROP
iptables -A OUTPUT -j DROP
iptables -A FORWARD -j DROP
Figure 4 : iptables_start.sh
These rules are loaded on boot in the file: /etc/network/interfaces. The file rules.v4 is generated by the script below:
#!/bin/sh

./iptables_start.sh
iptables-save > rules.v4
cp ./rules.v4 /etc/network
Figure 5 : iptables_update.sh
The main pain of running remote boxes is not knowing the ip address e.g. dhcp on the home router assigning a new ip address to the wifi interface at the end of its lease. You can setup the ip address based on mac address, but there is always that case e.g. router reset, where you get a new, unknown ip address assigned, leaving you to pondering what ip address to ssh into. To get around this problem (most of the time) the raspberry pi emails its ip address when it detects an ip address change. To allow the pi to email followed the advice on this site : (Link). Software needed:
sudo apt-get install ssmtp
sudo apt-get install mailutils
Next edit the SSMTP configuration file /etc/ssmtp/ssmtp.conf, as below:
root=postmaster
mailhub=smtp.gmail.com:587
hostname=raspberrypi
AuthUser=NAME@gmail.com
AuthPass=PASSWORD
FromLineOverride=YES
UseSTARTTLS=YES
I think the root=postmaster line is wrong as i sometimes get get error messages, but otherwise works fine. To detect if the wifi interface is work, or a changing in ip address i use the following script:
#!/bin/sh

DATE=`date`
IPADDR="8.8.8.8"
WIFI_IPADDR=`/sbin/ifconfig wlan0 | grep "inet addr" | tr -s ' ' | cut -d' ' -f3 | cut -d':' -f2`

x=`ping -q -w 1 -c 1 $IPADDR | grep loss | cut -d' ' -f6`
#echo $WIFI_IPADDR $x

if test $x = "0%"
then
        /usr/bin/python /home/pi/bin/led_on.py
        echo "connected: " $DATE
        if test -f /home/pi/bin/ip_addr.txt
        then
                OLD_WIFI_IPADDR=`cat /home/pi/bin/ip_addr.txt`
                #echo $OLD_WIFI_IPADDR $WIFI_IPADDR
                if test $WIFI_IPADDR != $OLD_WIFI_IPADDR
                then
                        echo $WIFI_IPADDR > /home/pi/bin/ip_addr.txt
                        echo "New IP address: " $WIFI_IPADDR | mail -s "IP address change" NAME@gmail.com
                fi
        else
                echo $WIFI_IPADDR > /home/pi/bin/ip_addr.txt
        fi

else
        /usr/bin/python /home/pi/bin/led_off.py
        echo "not connected: " $DATE
        /sbin/ifdown --force wlan0
        sleep 10
        /sbin/ifup --force wlan0
fi
Figure 6 : connected.sh
This script pings Google DNS, if it can not get a response it resets the wifi interface. If there is a connection it compares the current ip address to the one read previously, if they do not match it sends an email, otherwise the script exits. This script is called every 20 minutes using the cron entry below:
*/20 * * * * /home/pi/bin/connected.sh >> /home/pi/bin/connected.log
To be honest have not fully tested the re-connection part, but it seems to work ok. The reset and shutdown buttons are as the previous pi-case example : (Link), wiring and code for this box are shown below :
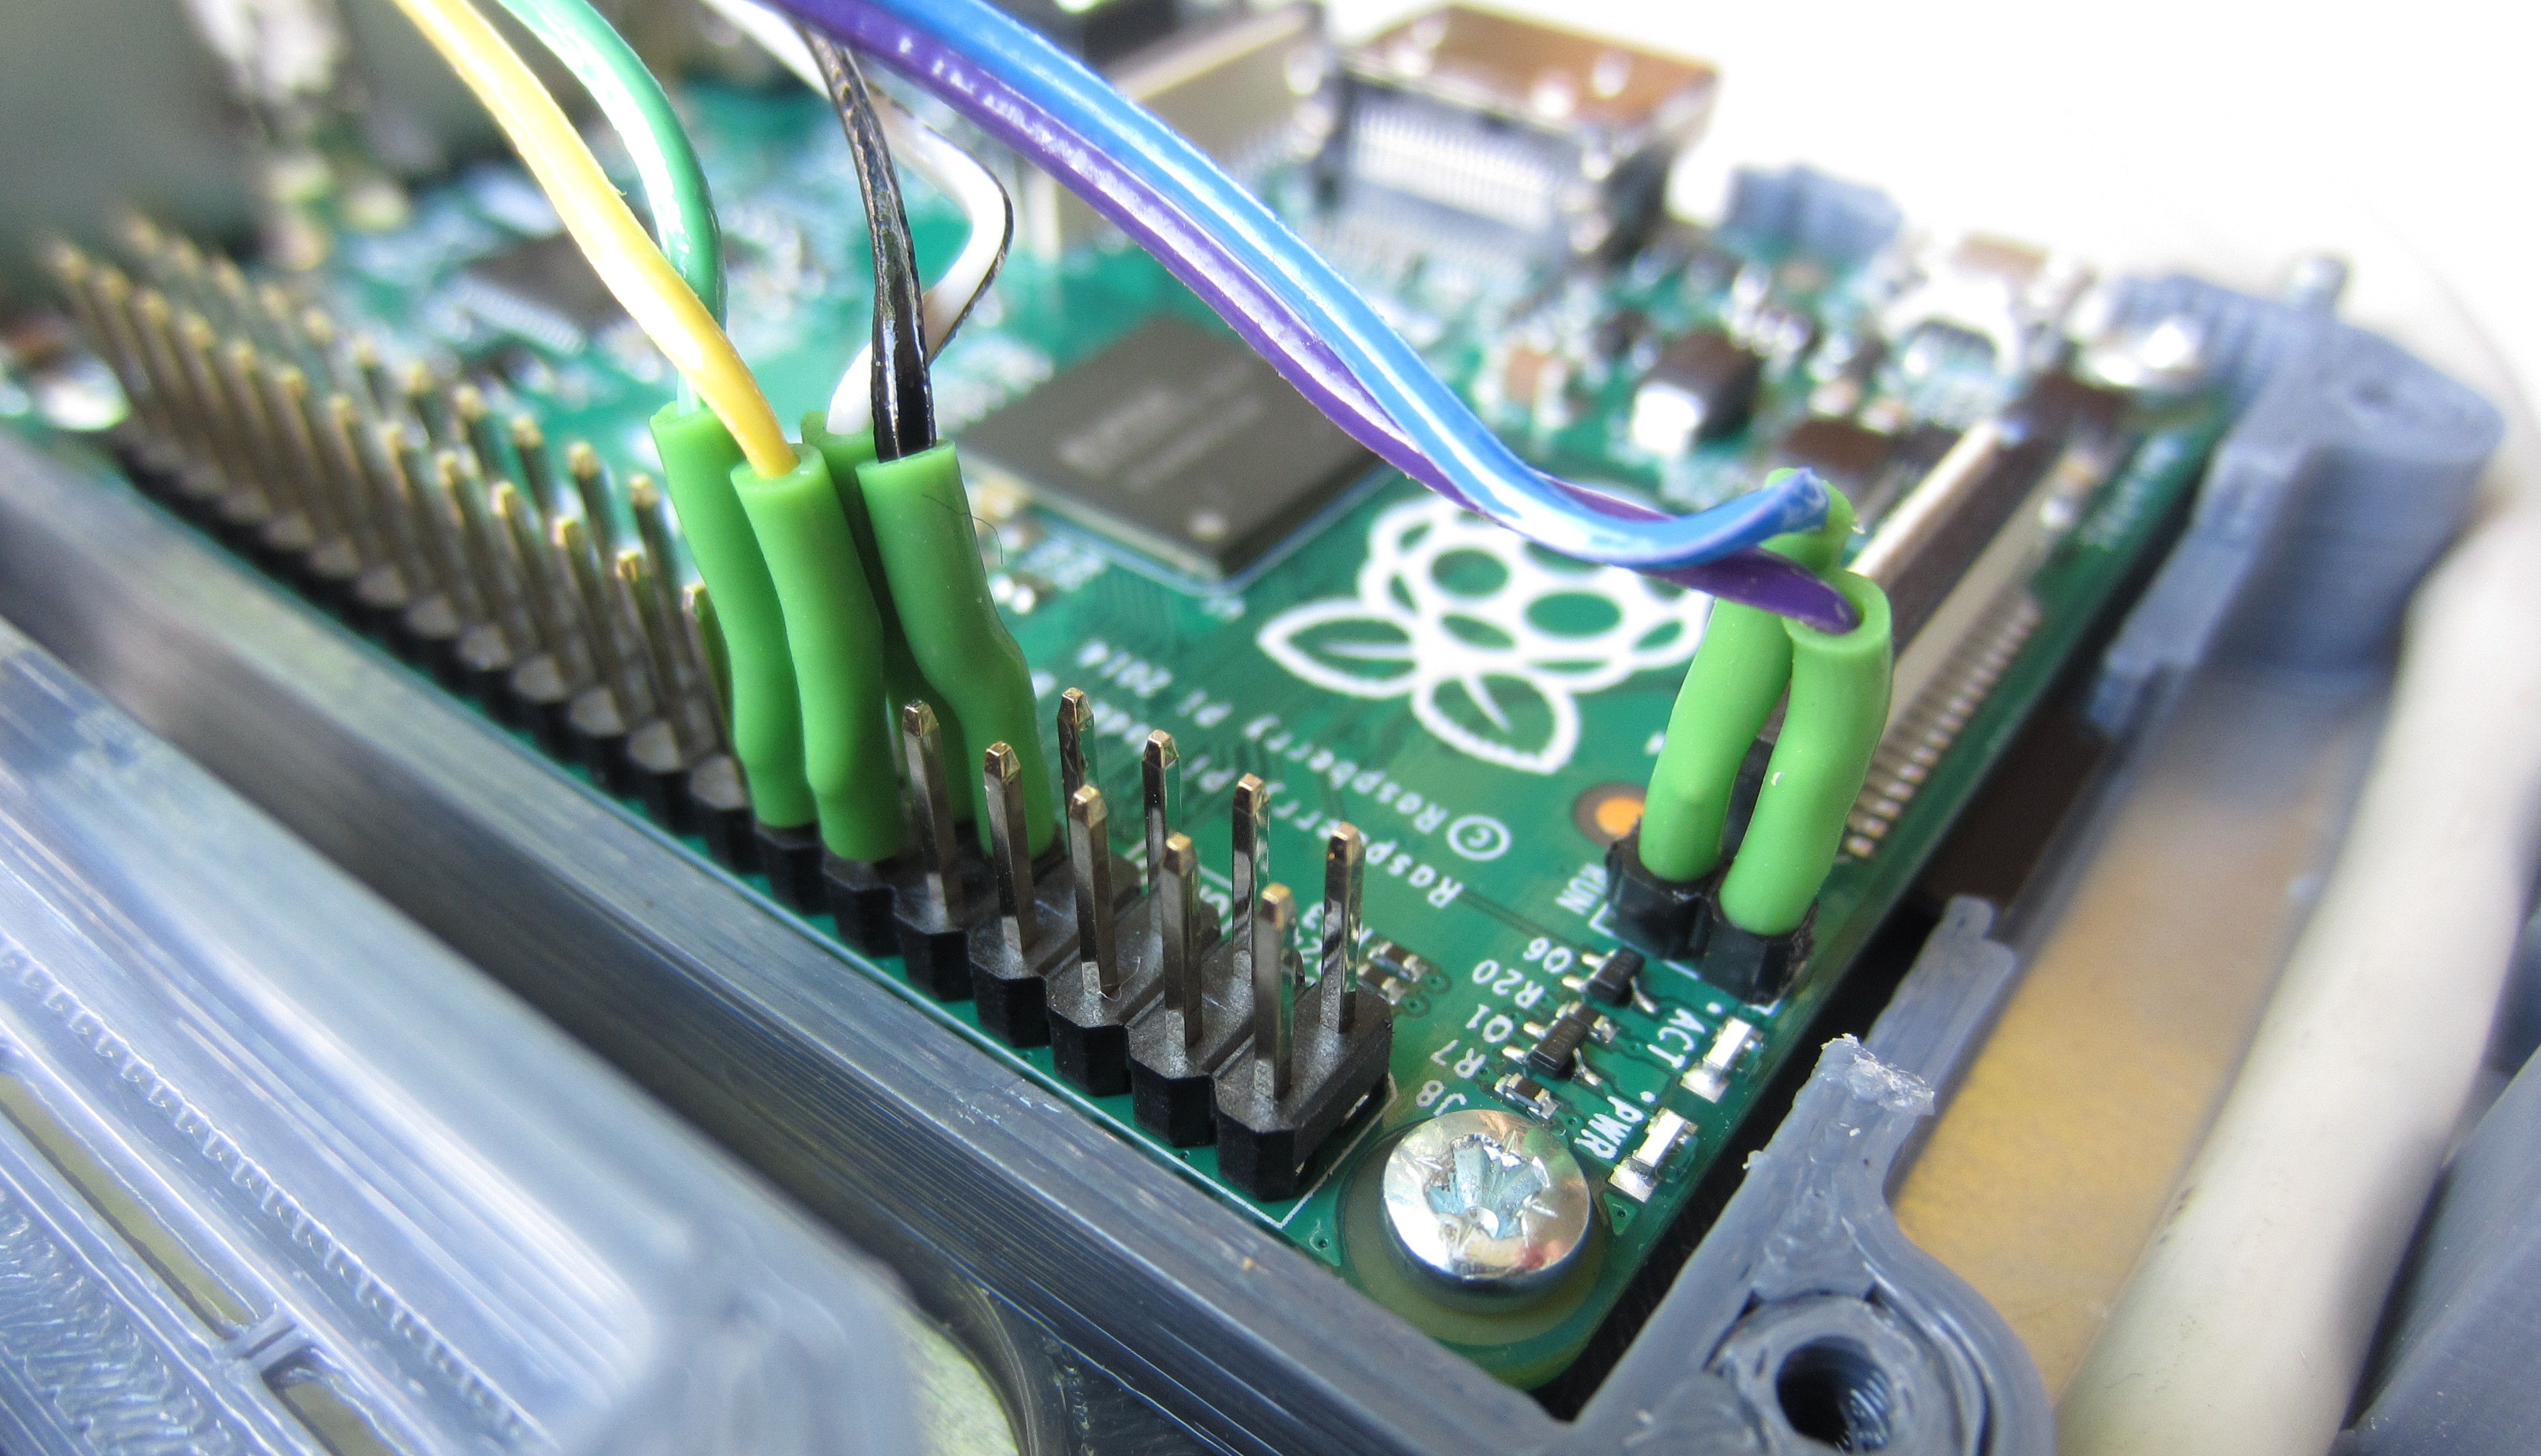
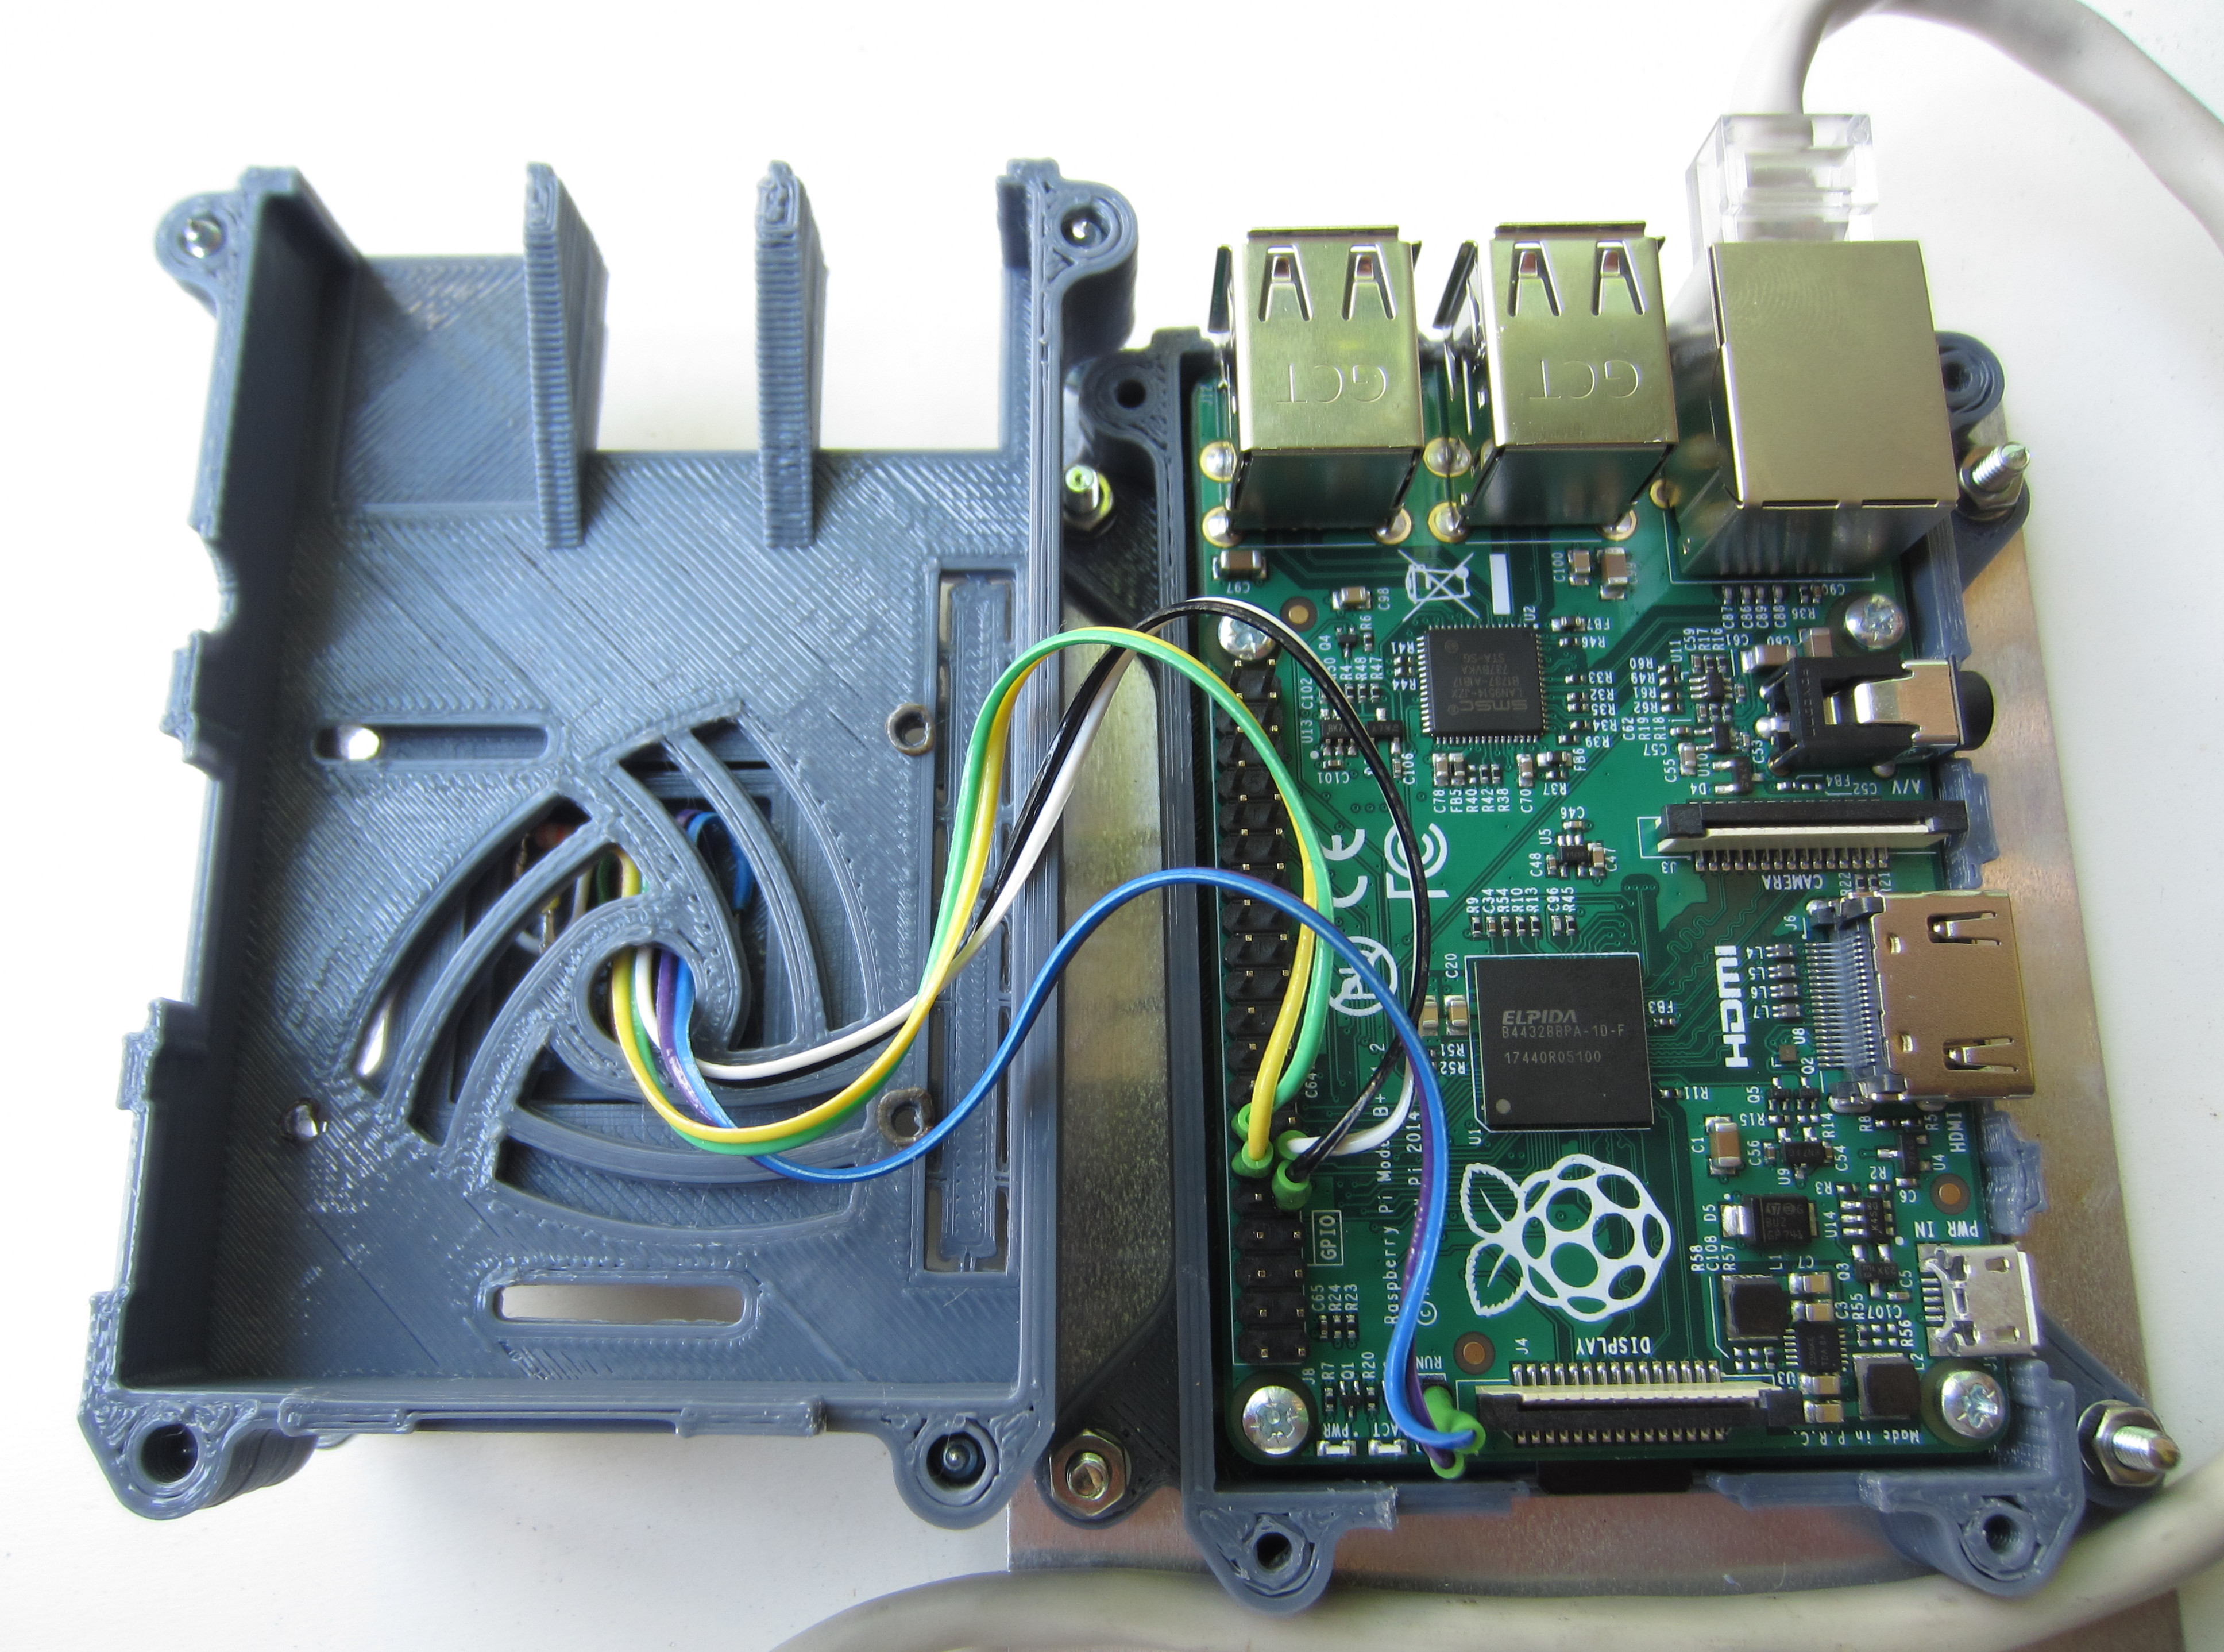
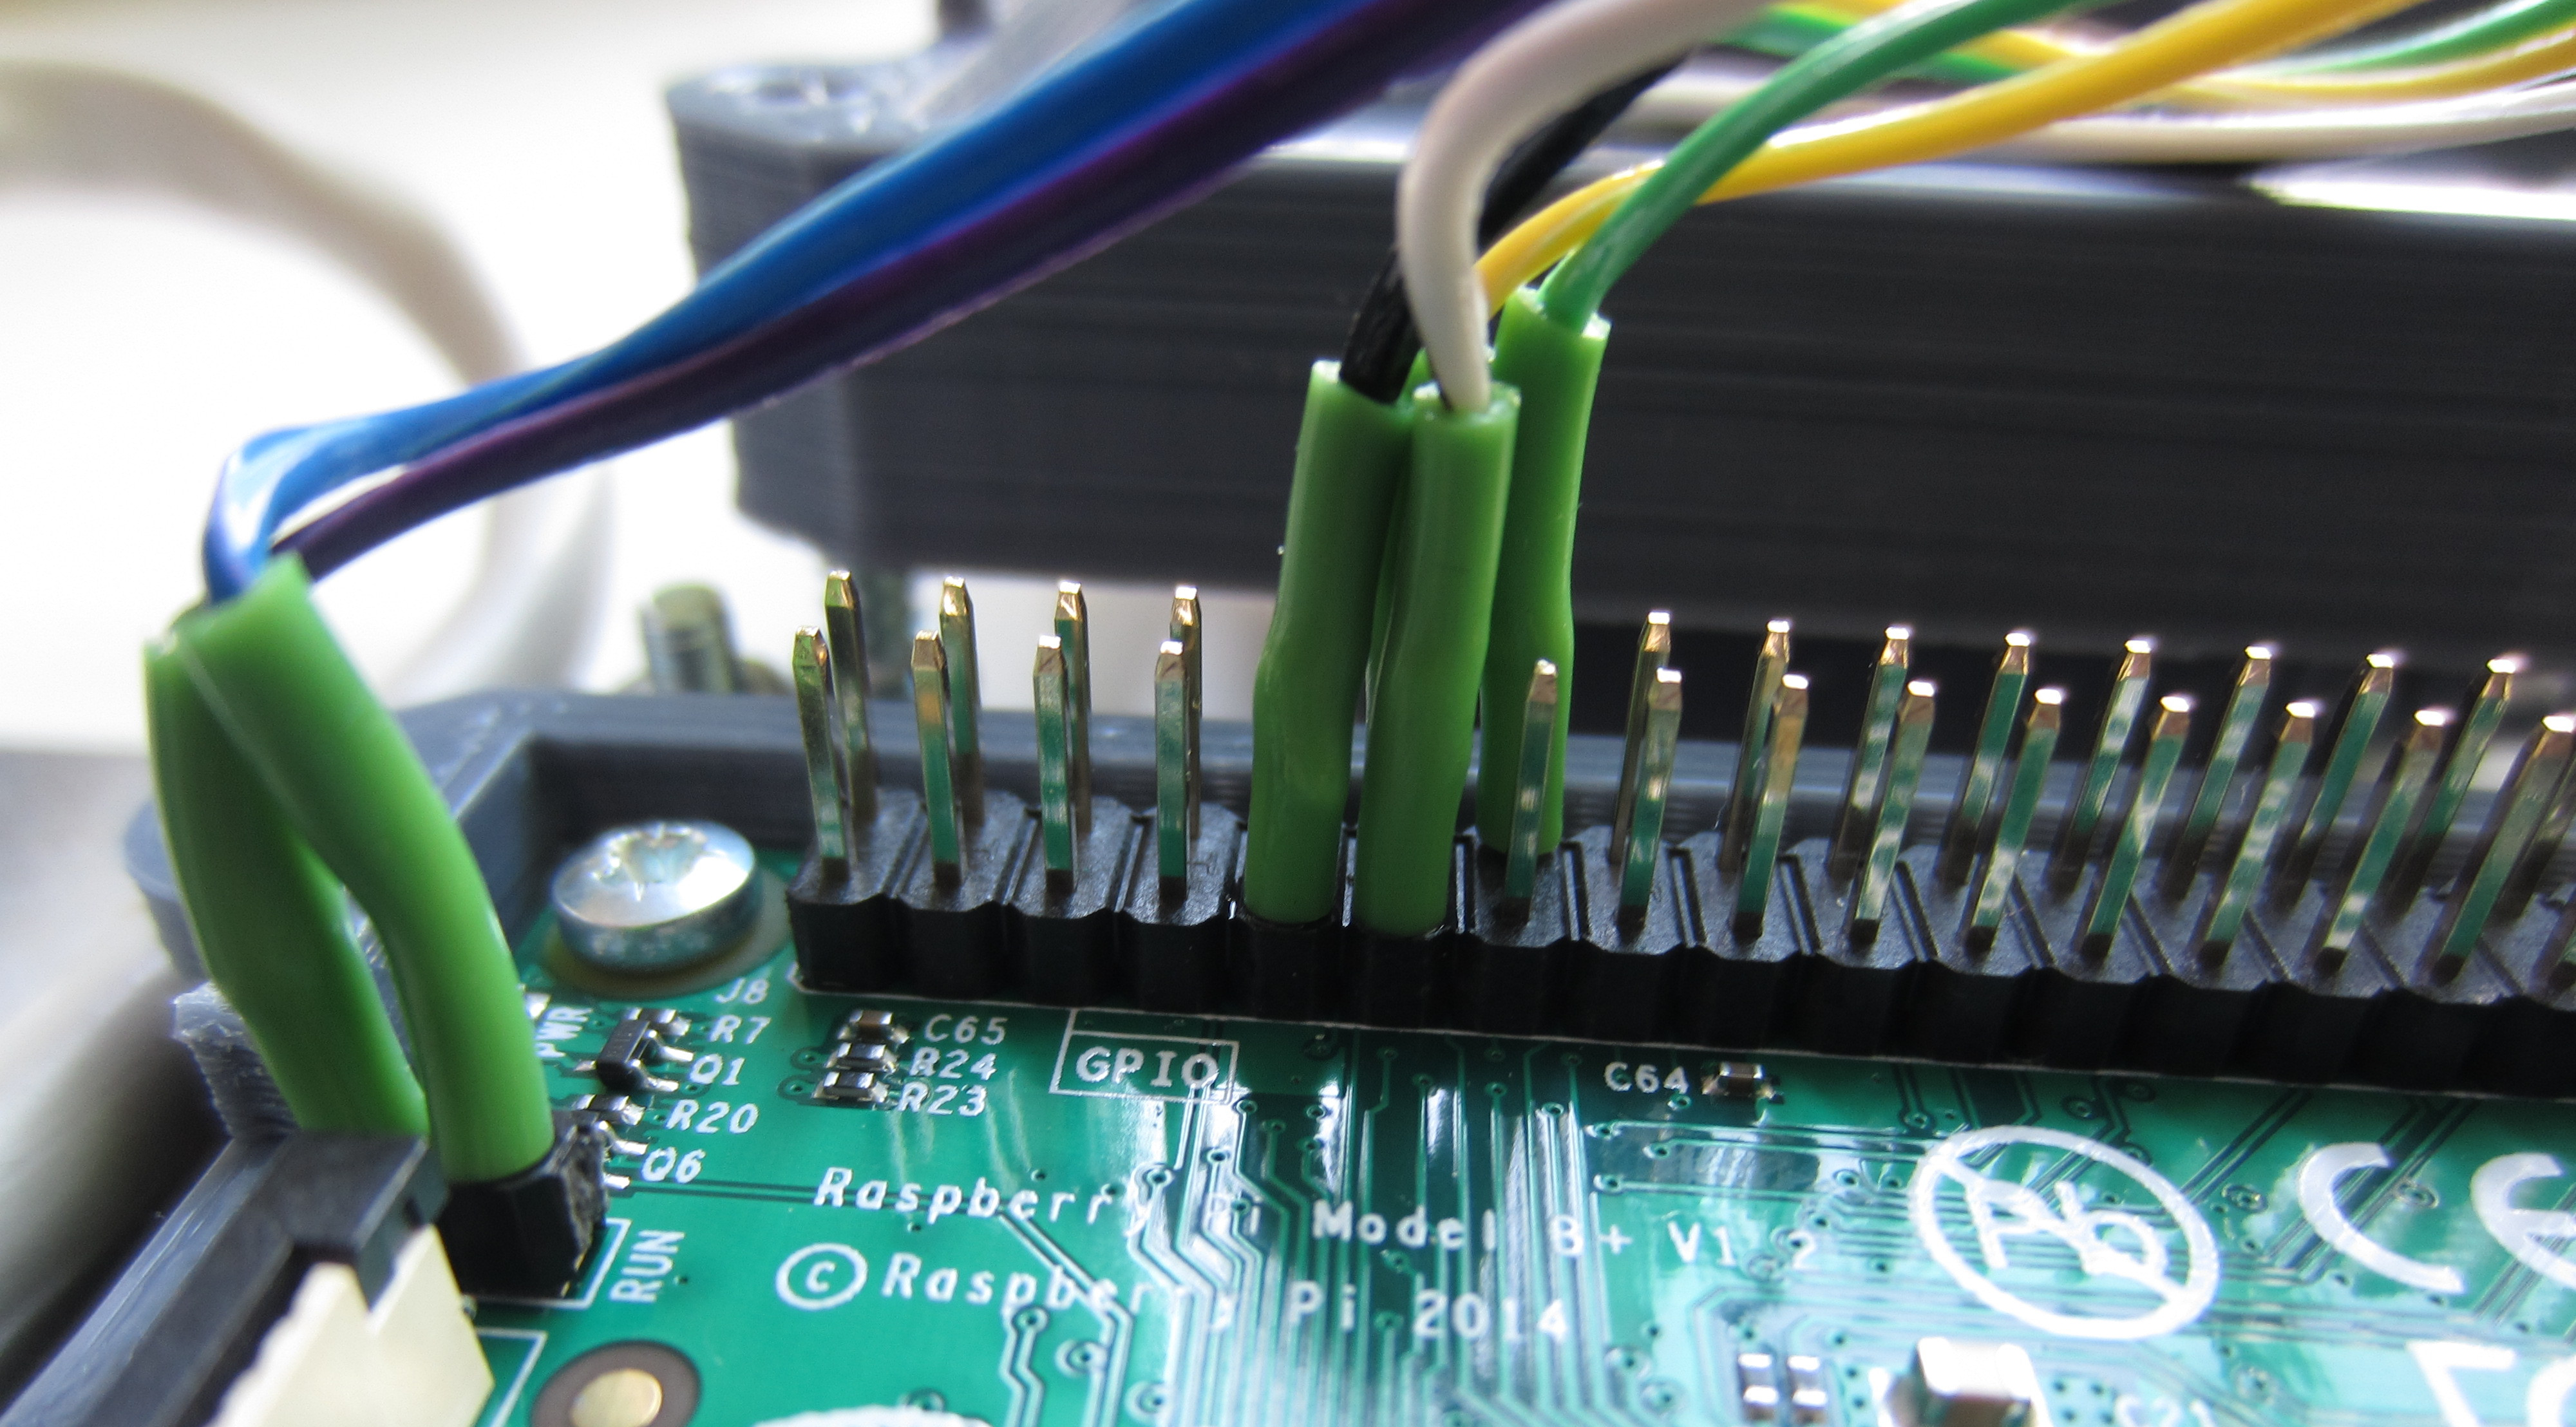
Figure 7 : reset / shutdown switch and led wiring
import RPi.GPIO as GPIO
import time
import os

GPIO.setmode(GPIO.BCM)
GPIO.setup(18, GPIO.IN, pull_up_down=GPIO.PUD_UP)

try:
        GPIO.wait_for_edge(18, GPIO.FALLING)
        print("shutdown -h now")
        os.system("shutdown -h now")
except:
        pass

GPIO.cleanup()
Figure 8 : shutdown.py
import RPi.GPIO as GPIO

PINi = 17
GPIO.setwarnings( False )
GPIO.setmode( GPIO.BCM )
GPIO.setup( PIN, GPIO.OUT )
GPIO.output( PIN, True )
Figure 9 : led_on.py
import RPi.GPIO as GPIO

PINi = 17
GPIO.setwarnings( False )
GPIO.setmode( GPIO.BCM )
GPIO.setup( PIN, GPIO.OUT )
GPIO.output( PIN, False )
Figure 10 : led_off.py

This work is licensed under a Creative Commons Attribution-NonCommercial-NoDerivatives 4.0 International License.
Back